Epson 2190N User Manual - Page 39
Default-setting mode, button. The printer prints the first setting and its current value.
 |
UPC - 010343850026
View all Epson 2190N manuals
Add to My Manuals
Save this manual to your list of manuals |
Page 39 highlights
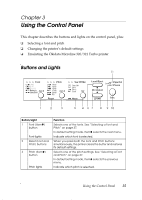
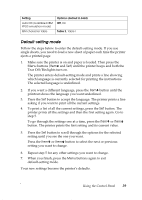
Setting Auto CR (available in IBM PPDS emulation mode) IBM character table Options (default in bold) Off, On Table 2, Table1 Default-setting mode Follow the steps below to enter the default-setting mode. If you use single sheets, you need to load a new sheet of paper each time the printer ejects a printed page. 1. Make sure the printer is on and paper is loaded. Then press the Menu buttons (ItemU and Set) until the printer beeps and both the Tear Off/Bin lights turn on. The printer enters default-setting mode and prints a line showing which language is currently selected for printing the instructions. The selected language is underlined. 2. If you want a different language, press the ItemD button until the printout shows the language you want underlined. 3. Press the Set button to accept the language. The printer prints a line asking if you want to print all the current settings. 4. To print a list of all the current settings, press the Set button. The printer prints all the settings and then the first setting again. Go to step 5. To go through the settings one at a time, press the ItemD or ItemU button. The printer prints the first setting and its current value. 5. Press the Set button to scroll through the options for the selected setting until you see the one you want. Press the ItemD or ItemU button to select the next or previous setting you want to change. 6. Repeat step 5 for any other settings you want to change. 7. When you finish, press the Menu buttons again to exit default-setting mode. Your new settings become the printer's defaults. Using the Control Panel 39
-
 1
1 -
2
-
3
-
4
-
5
-
6
-
7
-
8
-
9
-
10
-
11
-
12
-
13
-
14
-
15
-
16
-
17
-
18
-
19
-
20
-
21
-
22
-
23
-
24
-
25
-
26
-
27
-
28
-
29
-
30
-
31
-
32
-
33
-
 34
34 -
 35
35 -
 36
36 -
 37
37 -
 38
38 -
 39
39 -
 40
40 -
 41
41 -
 42
42 -
 43
43 -
 44
44 -
45
-
46
-
47
-
48
 |
 |