Epson 6100i Operation Guide - EasyMP Monitor v4.40 - Page 18
Registering several projectors to a monitoring group all at once, Use Serial
 |
UPC - 010343858176
View all Epson 6100i manuals
Add to My Manuals
Save this manual to your list of manuals |
Page 18 highlights
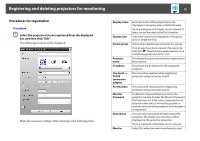
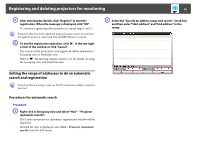
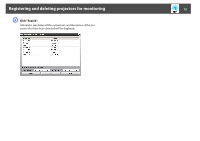
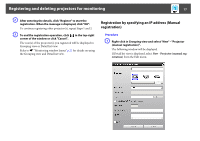
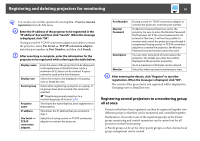
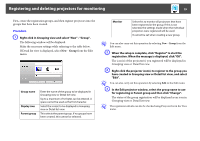
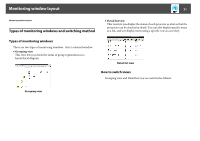
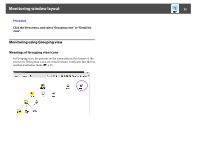
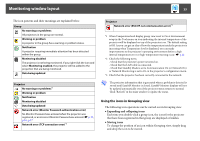
Registering and deleting projectors for monitoring 18 q You can also carry out this operation by selecting New - Projector (manual registration) from the Edit menu. B Enter the IP address of the projector to be registered in the "IP address" box and then click "Search". When the message is displayed, click "OK". If using a serial W TCP/IP conversion adapter and cable to connect the projector, select Use Serial W TCP/IP conversion adaptor., enter the port number in Port Number, and then click Search. C After searching is complete, enter the information for the projector to be registered while referring to the table below. Display name Display icon Parent group Projector name IP address Use Serial W TCP/IP conversion adaptor. Enter the name of the projector(s) to be displayed in Grouping view or Detail list view. Up to a maximum of 32 bytes can be entered. A space cannot be used as the first character. Select the icon(s) to be displayed in Grouping view or Detail list view. Select when registering a projector in a group. If no groups have been created, this cannot be selected. s "Registering several projectors to a monitoring group all at once" p.18 This shows the name that has been registered on the projector. This shows the IP address that you entered in step 2. Select this if using a serial W TCP/IP conversion adapter to connect the projector. Port Number If using a serial W TCP/IP conversion adapter to connect the projector, enter the port number. Monitor Password If a Monitor Password has been set for the projector, be sure to enter the Monitor Password that has been set. If the correct password is not entered at this time, it will not be possible to monitor and control the projector even though it is registered. If using a serial W TCP/IP conversion adapter to connect the projector, the Monitor Password security function cannot be used. Description You can enter some kind of memo about the projector. The details you enter here will be displayed at the projector properties. Up to a maximum of 60 bytes can be entered. Monitor Select this when you want monitoring to start. D After entering the details, click "Register" to start the registration. When the message is displayed, click "OK". The icon(s) of the projector(s) you registered will be displayed in Grouping view or Detail list view. Registering several projectors to a monitoring group all at once Projectors that have been registered can then be registered together into different groups so that they can be monitored and controlled together. Furthermore, if you select one of the registered groups as the Parent group, monitoring and control operations can be carried out for all projectors in that Parent group. A Parent group can be set for other parent groups, so that a hierarchical group arrangement can be created.
-
 1
1 -
2
-
3
-
4
-
5
-
6
-
7
-
8
-
9
-
10
-
11
-
12
-
 13
13 -
 14
14 -
 15
15 -
 16
16 -
 17
17 -
 18
18 -
 19
19 -
 20
20 -
 21
21 -
 22
22 -
 23
23 -
24
-
25
-
26
-
27
-
28
-
29
-
30
-
31
-
32
-
33
-
34
-
35
-
36
-
37
-
38
-
39
-
40
-
41
-
42
-
43
-
44
-
45
-
46
-
47
 |
 |