Epson 6100i Operation Guide - EasyMP Monitor v4.40 - Page 37
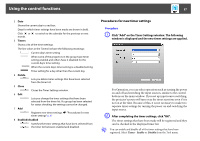
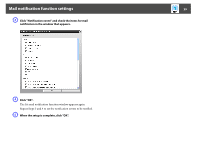
Procedures for new timer settings, Click Add on the Timer Settings window. The following
 |
UPC - 010343858176
View all Epson 6100i manuals
Add to My Manuals
Save this manual to your list of manuals |
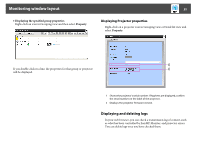
Page 37 highlights
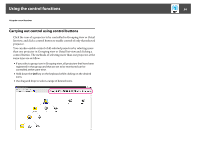
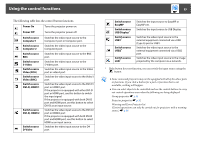
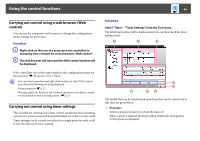
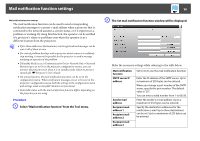
Using the control functions 37 2 Date Shows the current day in a red box. Days for which timer settings have been made are shown in bold. Click or month. to switch to the calendar for the previous or next 3 Timers Shows a list of the timer settings. The line colors in the Timers list have the following meanings: Current day's timer setting When some of the projectors in the group have timer setting enabled and others have it disabled for the current day's timer setting When the current day's timer setting is a disabled setting Timer setting for a day other than the current day 4 Delete Lets you delete timer settings that have been selected from the timer list. 5 Close Closes the Timer Settings window. 6 Edit Lets you change the timer settings that have been selected from the timer list. If a group has been selected for status checking, the settings cannot be changed. 7 Add Registers new timer settings. s "Procedures for new timer settings" p.37 8 Enabled/disabled Switches the timer settings that have been selected from the timer list between enabled and disabled. Procedures for new timer settings Procedure A Click "Add" on the Timer Settings window. The following window is displayed and the new timer settings are applied. For Operation, you can select operations such as turning the power on and off and switching the input sources, similar to the control buttons on the main window. If you set up input source switching, the projector's power will turn on at the timer start time even if it is not on at the time. Because of this, it is not necessary to make two separate timer settings for turning the power on and switching the input source. B After completing the timer settings, click "OK". The timer settings that have been made will be registered and they can be checked in the displayed timer list. q You can enable and disable all of the timer settings that have been registered. Select Timer - Enable or Disable from the Tool menu.
-
 1
1 -
2
-
3
-
4
-
5
-
6
-
7
-
8
-
9
-
10
-
11
-
12
-
13
-
14
-
15
-
16
-
17
-
18
-
19
-
20
-
21
-
22
-
23
-
24
-
25
-
26
-
27
-
28
-
29
-
30
-
31
-
 32
32 -
 33
33 -
 34
34 -
 35
35 -
 36
36 -
 37
37 -
 38
38 -
 39
39 -
 40
40 -
 41
41 -
 42
42 -
43
-
44
-
45
-
46
-
47
 |
 |
