Epson 7700p User Manual - Page 50
Repositioning the Image, Adjusting Image Appearance, Lightens or darkens the overall image.
 |
View all Epson 7700p manuals
Add to My Manuals
Save this manual to your list of manuals |
Page 50 highlights
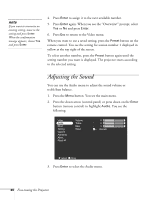
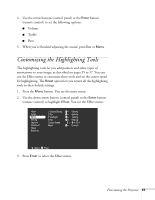
note If you have repositioned the image or adjusted the sync setting, you can use the Auto button on the remote control to restore the default settings. Repositioning the Image Follow these steps to fine-tune the image position: 1. Press the Menu button. You see the main menu. 2. Press Enter to select the Video menu. 3. Press Enter to select the Position option. You see the following on the right side of the screen: 4. Use the arrow buttons (control panel) or the Enter button (remote control) to move the image left, right, up, or down. 5. When the image is positioned the way you want, press Esc. Adjusting Image Appearance Follow these steps to adjust the appearance of your image: 1. Press the Menu button. You see the main menu. 2. Press Enter to select the Video menu. 3. Use the arrow buttons (control panel) or the Enter button (remote control) to set one of the following options: I Brightness Lightens or darkens the overall image. I Contrast Adjusts the difference between light and dark areas. I Tracking (computer images only) Removes unwanted vertical lines from a computer image by matching the projector's internal clock to various computer signals. I Sync (computer images only) Corrects fuzziness or screen flicker by synchronizing the projector with the tracking signal sent from the computer. I Color (composite video or S-Video only) Adjusts the depth or intensity of the image. 44 Fine-tuning the Projector
-
 1
1 -
2
-
3
-
4
-
5
-
6
-
7
-
8
-
9
-
10
-
11
-
12
-
13
-
14
-
15
-
16
-
17
-
18
-
19
-
20
-
21
-
22
-
23
-
24
-
25
-
26
-
27
-
28
-
29
-
30
-
31
-
32
-
33
-
34
-
35
-
36
-
37
-
38
-
39
-
40
-
41
-
42
-
43
-
44
-
 45
45 -
 46
46 -
 47
47 -
 48
48 -
 49
49 -
 50
50 -
 51
51 -
 52
52 -
 53
53 -
 54
54 -
 55
55 -
56
-
57
-
58
-
59
-
60
-
61
-
62
-
63
-
64
-
65
-
66
-
67
-
68
-
69
-
70
-
71
-
72
-
73
-
74
-
75
-
76
-
77
-
78
-
79
-
80
-
81
-
82
-
83
-
84
-
85
-
86
-
87
-
88
-
89
-
90
-
91
-
92
-
93
-
94
-
95
-
96
-
97
-
98
-
99
-
100
-
101
-
102
-
103
-
104
-
105
-
106
-
107
-
108
-
109
-
110
-
111
-
112
-
113
-
114
-
115
-
116
 |
 |
