Epson 7700p User Manual - Page 59
Setting Advanced Features, and 10000 K. Select
 |
View all Epson 7700p manuals
Add to My Manuals
Save this manual to your list of manuals |
Page 59 highlights
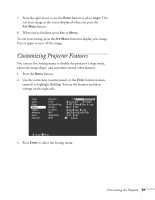
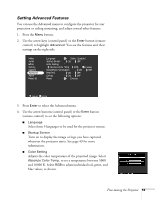
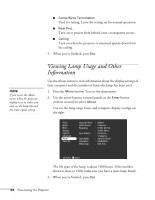
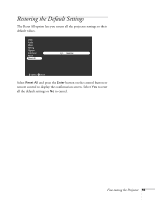
Setting Advanced Features You can use the Advanced menu to configure the projector for rear projection or ceiling mounting, and adjust several other features. 1. Press the Menu button. 2. Use the arrow keys (control panel) or the Enter button (remote control) to highlight Advanced. You see the features and their settings on the right side: Video Audio Effect Setting Capture Advanced About Reset All Language Select [English] Startup Screen : ON OFF Color Setting : Absolute Color Temp. RGB Select Comp2Sync Termination : ON OFF Rear Proj. : ON OFF Ceiling : ON OFF Reset Execute :Select :Enter 3. Press Enter to select the Advanced menu. 4. Use the arrow buttons (control panel) or the Enter button (remote control) to set the following options: I Language Select from 9 languages to be used for the projector menus. I Startup Screen Turn on to display the image or logo you have captured whenever the projector starts. See page 49 for more information. I Color Setting Adjusts the color temperature of the projected image. Select Absolute Color Temp. to set a temperature between 5000 and 10000 K. Select RGB to adjust individual red, green, and blue values, as shown. Fine-tuning the Projector 53
-
 1
1 -
2
-
3
-
4
-
5
-
6
-
7
-
8
-
9
-
10
-
11
-
12
-
13
-
14
-
15
-
16
-
17
-
18
-
19
-
20
-
21
-
22
-
23
-
24
-
25
-
26
-
27
-
28
-
29
-
30
-
31
-
32
-
33
-
34
-
35
-
36
-
37
-
38
-
39
-
40
-
41
-
42
-
43
-
44
-
45
-
46
-
47
-
48
-
49
-
50
-
51
-
52
-
53
-
 54
54 -
 55
55 -
 56
56 -
 57
57 -
 58
58 -
 59
59 -
 60
60 -
 61
61 -
 62
62 -
 63
63 -
 64
64 -
65
-
66
-
67
-
68
-
69
-
70
-
71
-
72
-
73
-
74
-
75
-
76
-
77
-
78
-
79
-
80
-
81
-
82
-
83
-
84
-
85
-
86
-
87
-
88
-
89
-
90
-
91
-
92
-
93
-
94
-
95
-
96
-
97
-
98
-
99
-
100
-
101
-
102
-
103
-
104
-
105
-
106
-
107
-
108
-
109
-
110
-
111
-
112
-
113
-
114
-
115
-
116
 |
 |
