Epson 836XL User Setup Information - Page 45
Scanning with LaserSoft SilverFast 4.0, Start Photoshop.
 |
UPC - 010343820098
View all Epson 836XL manuals
Add to My Manuals
Save this manual to your list of manuals |
Page 45 highlights
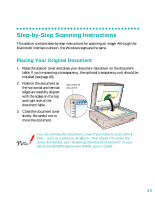
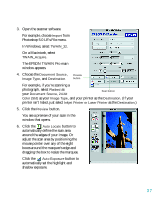
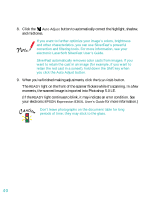
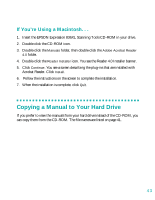
Scanning with LaserSoft SilverFast 4.0 LaserSoft SilverFast 4.0 provides a professional-quality interface between your EPSON Expression 836XL scanner and the sophisticated imaging environment of Adobe Photoshop. If your scanner didn't come with SilverFast, skip to page 41. 1. Start Photoshop. 2. Choose Import from the File menu and select SilverFast (Epson). The personalization dialog box appears. 3. Enter your name and company, and then enter the serial number of your software exactly as it appears on the CD-ROM cover (using only capital letters). 4. Click OK. The SilverFast main window appears. toolbar The first time you start SilverFast, the ScanPilot™ window appears. You can press the Start button to have the ScanPilot walk you through the basic scanning steps. Start button Prescan button selection marquee 5. Click the Prescan button to preview your scan. You see the preview on the right side of the main window. 6. Click and drag the selection marquee to the edges of your image to define the scan area. 7. Under Image Type, select the kind of image you are scanning. 39
-
 1
1 -
2
-
3
-
4
-
5
-
6
-
7
-
8
-
9
-
10
-
11
-
12
-
13
-
14
-
15
-
16
-
17
-
18
-
19
-
20
-
21
-
22
-
23
-
24
-
25
-
26
-
27
-
28
-
29
-
30
-
31
-
32
-
33
-
34
-
35
-
36
-
37
-
38
-
39
-
 40
40 -
 41
41 -
 42
42 -
 43
43 -
 44
44 -
 45
45 -
 46
46 -
 47
47 -
 48
48 -
 49
49 -
 50
50 -
51
-
52
-
53
-
54
-
55
-
56
-
57
-
58
-
59
-
60
-
61
-
62
-
63
-
64
-
65
-
66
-
67
-
68
-
69
-
70
-
71
-
72
-
73
 |
 |