Epson 836XL User Setup Information - Page 58
Attach the ADF's connector to, the scanner's option interface.
 |
UPC - 010343820098
View all Epson 836XL manuals
Add to My Manuals
Save this manual to your list of manuals |
Page 58 highlights
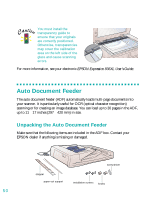
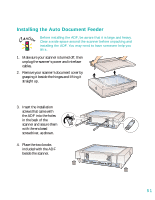
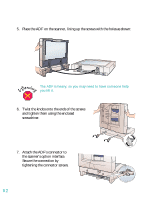
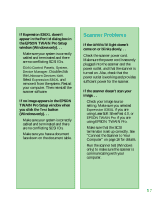
5. Place the ADF on the scanner, lining up the screws with the holes as shown: . The ADF is heavy, so you may need to have someone help you lift it. 6. Twist the knobs onto the ends of the screws and tighten them using the enclosed screwdriver. 7. Attach the ADF's connector to the scanner's option interface. Secure the connection by tightening the connector screws. 52
-
 1
1 -
2
-
3
-
4
-
5
-
6
-
7
-
8
-
9
-
10
-
11
-
12
-
13
-
14
-
15
-
16
-
17
-
18
-
19
-
20
-
21
-
22
-
23
-
24
-
25
-
26
-
27
-
28
-
29
-
30
-
31
-
32
-
33
-
34
-
35
-
36
-
37
-
38
-
39
-
40
-
41
-
42
-
43
-
44
-
45
-
46
-
47
-
48
-
49
-
50
-
51
-
52
-
 53
53 -
 54
54 -
 55
55 -
 56
56 -
 57
57 -
 58
58 -
 59
59 -
 60
60 -
 61
61 -
 62
62 -
 63
63 -
64
-
65
-
66
-
67
-
68
-
69
-
70
-
71
-
72
-
73
 |
 |

52
5.
Place the ADF on the scanner, lining up the screws with the holes as shown:
.
The ADF is heavy, so you may need to have someone help
you lift it.
6.
Twist the knobs onto the ends of the screws
and tighten them using the enclosed
screwdriver.
7.
Attach the ADF’s connector to
the scanner’s option interface.
Secure the connection by
tightening the connector screws.