Epson B-510DN User's Guide - Page 72
See Loading Paper on Right
 |
View all Epson B-510DN manuals
Add to My Manuals
Save this manual to your list of manuals |
Page 72 highlights
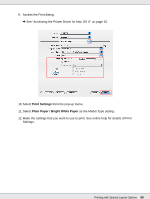
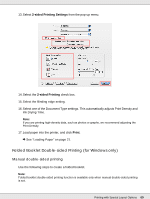
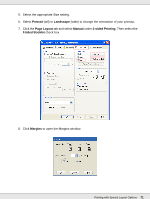
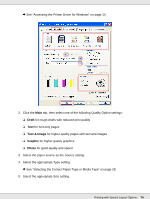
9. Specify the edge of the paper where the binding will be placed. You can choose Left, Top, or Right. Note: When you select Portrait as the Orientation setting, the Left or Right binding positions are available. The Top binding position is available when you select Landscape as the Orientation setting. 10. Choose cm or inch as the Unit setting. Specify the width of the binding margin. Portrait Landscape * : Folding edge ** : Margin You can enter any width from 0.12 to 1.18 inches, or from 0.3 to 3.0 cm. The specified margin width will be used on both sides of the fold. For example, if you specify a 1 inch margin, you will get a 2 inch margin (a margin of 1 inch will be placed on each side of the fold). 11. Click OK to return to the Page Layout window. Then click OK to save your settings. 12. Load paper into the rear sheet feeder, then send the print job from your application. Instructions for printing the inside pages will be displayed while the outside pages are printed. & See "Loading Paper" on page 21. 13. Follow the on-screen instructions to reload the paper. Note: ❏ The paper may curl during printing due to the amount of ink used. Should this occur, slightly curl the sheets in the opposite direction before reloading them. ❏ Align the sheet stack by tapping its edges against a hard, flat surface before reloading it in the printer. Printing with Special Layout Options 72
-
 1
1 -
2
-
3
-
4
-
5
-
6
-
7
-
8
-
9
-
10
-
11
-
12
-
13
-
14
-
15
-
16
-
17
-
18
-
19
-
20
-
21
-
22
-
23
-
24
-
25
-
26
-
27
-
28
-
29
-
30
-
31
-
32
-
33
-
34
-
35
-
36
-
37
-
38
-
39
-
40
-
41
-
42
-
43
-
44
-
45
-
46
-
47
-
48
-
49
-
50
-
51
-
52
-
53
-
54
-
55
-
56
-
57
-
58
-
59
-
60
-
61
-
62
-
63
-
64
-
65
-
66
-
 67
67 -
 68
68 -
 69
69 -
 70
70 -
 71
71 -
 72
72 -
 73
73 -
 74
74 -
 75
75 -
 76
76 -
 77
77 -
78
-
79
-
80
-
81
-
82
-
83
-
84
-
85
-
86
-
87
-
88
-
89
-
90
-
91
-
92
-
93
-
94
-
95
-
96
-
97
-
98
-
99
-
100
-
101
-
102
-
103
-
104
-
105
-
106
-
107
-
108
-
109
-
110
-
111
-
112
-
113
-
114
-
115
-
116
-
117
-
118
-
119
-
120
-
121
-
122
-
123
-
124
-
125
-
126
-
127
-
128
-
129
-
130
-
131
-
132
-
133
-
134
-
135
-
136
-
137
-
138
-
139
-
140
-
141
-
142
-
143
-
144
-
145
-
146
-
147
-
148
-
149
-
150
-
151
-
152
-
153
-
154
-
155
-
156
-
157
-
158
-
159
-
160
-
161
-
162
-
163
-
164
-
165
-
166
-
167
-
168
-
169
-
170
-
171
-
172
-
173
-
174
-
175
-
176
-
177
-
178
-
179
-
180
-
181
-
182
-
183
-
184
-
185
-
186
-
187
-
188
-
189
-
190
 |
 |
