Epson Stylus Pro 9000 Service Manual - Page 117
Check Skew, Input Rank (Printhead ID) Adjustment, If you did not replace the printheads
 |
View all Epson Stylus Pro 9000 manuals
Add to My Manuals
Save this manual to your list of manuals |
Page 117 highlights
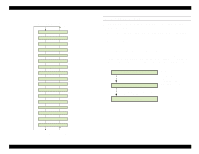
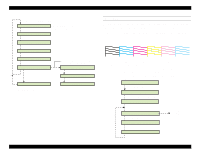
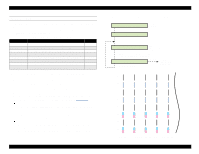
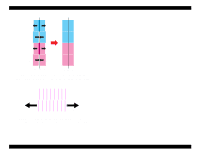
EPSON Stylus Pro 9000 CHECK SKEW This adjustment sets the vertical distance over which paper skew is measured in test prints. This adjustment is for service printouts only and does not affect user printouts.The standard distance is 1 meter; a smaller distance decreases the magnitude of detected skew-error. 1. Make sure "Adj: Check Skew" appears on the LCD and press the Enter button. 2. If the paper is not loaded, "Please Set Paper" appears and you need to load the paper. 3. After paper is loaded, "Check Skew 1.0m" appears. Use the Paper Feed +/- buttons to adjust the vertical distance over which skew is measured in increments of 0.1 m. Note that the distance you set must be less than the length of the paper, if using cut sheets. 4. After setting the distance, press the Enter button to begin the detection operation. After the skew is correctly detected, "Skew Result: xxxx" appears. A "+" before the number indicates the paper is skewed to the HP side; a "-" indicates the paper is skewed away from HP. Note that the result must be read in millimeters (even though the display indicates meters). Please Set Paper Paper initializes Check Skew 1.0m Press [Enter] Exc. Skew Paper edges detected Skew Result:+1.234m Press Paper Feed +/to change the skew- check distance (0.1 m increments) INPUT RANK (PRINTHEAD ID) ADJUSTMENT This function allows you to write each printhead's ID to the main board. NOTE: Perform this adjustment whenever you replace a printhead. You don't need to perform this adjustment when replacing the main board, unless you replace the printheads along with it, or if you don't back up the parameters. 1. Make sure "Adj: Input Rank" appears on the LCD and press the Enter button. 2. First enter the B head (K/C/M) ID. Press the Paper Feed +/- button to select the ID value. After correctly entering the Head B ID, press the Enter button to enter the Head C ID. If an out-of-range error ("Error Rank Input") occurs, press the Enter button and re-enter the ID. 3. After entering the head ID for both printheads, press the Enter button and "Enter Key" appears on the LCD. Press the Enter button again to write the printhead ID to the Main Board and begin the initial ink charge of the new heads. NOTE: If you did not replace the printheads, press the Pause button instead of the Enter button to skip the initial ink charge process. This saves ink. Adjustments 117
-
 1
1 -
2
-
3
-
4
-
5
-
6
-
7
-
8
-
9
-
10
-
11
-
12
-
13
-
14
-
15
-
16
-
17
-
18
-
19
-
20
-
21
-
22
-
23
-
24
-
25
-
26
-
27
-
28
-
29
-
30
-
31
-
32
-
33
-
34
-
35
-
36
-
37
-
38
-
39
-
40
-
41
-
42
-
43
-
44
-
45
-
46
-
47
-
48
-
49
-
50
-
51
-
52
-
53
-
54
-
55
-
56
-
57
-
58
-
59
-
60
-
61
-
62
-
63
-
64
-
65
-
66
-
67
-
68
-
69
-
70
-
71
-
72
-
73
-
74
-
75
-
76
-
77
-
78
-
79
-
80
-
81
-
82
-
83
-
84
-
85
-
86
-
87
-
88
-
89
-
90
-
91
-
92
-
93
-
94
-
95
-
96
-
97
-
98
-
99
-
100
-
101
-
102
-
103
-
104
-
105
-
106
-
107
-
108
-
109
-
110
-
111
-
 112
112 -
 113
113 -
 114
114 -
 115
115 -
 116
116 -
 117
117 -
 118
118 -
 119
119 -
 120
120 -
 121
121 -
 122
122 -
123
-
124
-
125
-
126
-
127
-
128
-
129
-
130
-
131
-
132
-
133
-
134
-
135
-
136
-
137
-
138
-
139
-
140
-
141
-
142
-
143
-
144
-
145
-
146
-
147
-
148
-
149
-
150
-
151
-
152
-
153
-
154
-
155
-
156
-
157
-
158
-
159
-
160
-
161
-
162
-
163
-
164
-
165
-
166
-
167
-
168
-
169
-
170
-
171
-
172
-
173
-
174
-
175
-
176
-
177
-
178
-
179
-
180
-
181
-
182
-
183
-
184
-
185
-
186
-
187
-
188
-
189
-
190
-
191
-
192
-
193
-
194
-
195
-
196
-
197
-
198
 |
 |