Epson Stylus Pro 9000 Service Manual - Page 92
Removing the Ink Tubes, Preparation, Removing the Ink Pipe Covers
 |
View all Epson Stylus Pro 9000 manuals
Add to My Manuals
Save this manual to your list of manuals |
Page 92 highlights
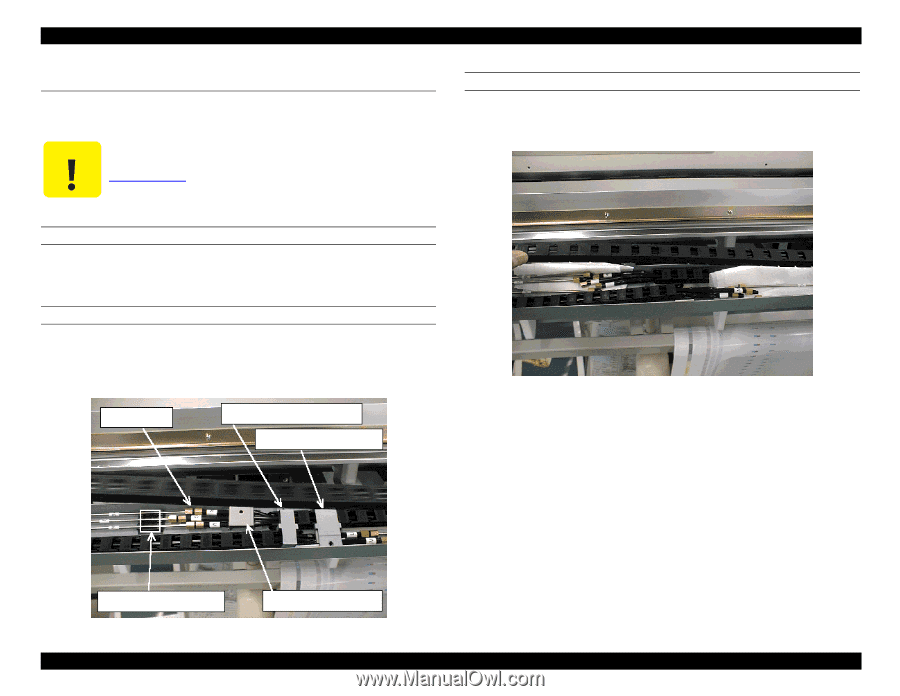
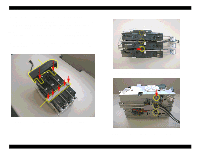
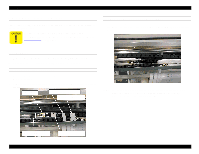
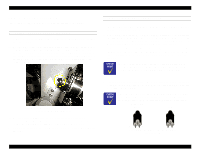
EPSON Stylus Pro 9000 4.7 Removing the Ink Tubes This section describes how to remove the ink tubes connected to the printhead on the carriage assembly. After reassembling the Ink Tubing, install new ink cartridges and perform the Initial Ink Charge operation. See Cleaning menu on page 128. SEPARATING THE INK PIPES AND INK TUBES 1. Loosen the screws securing the ink tubes to the ink pipes, and separate the tubes from the pipes. The screw and O-rings should remain on the tube ends. PREPARATION 1. Remove the Maintenance cover, Top Cover, and Right Side Cover. 2. Make sure both I/H Levers are raised to close the ink valves. REMOVING THE INK PIPE COVERS 1. Remove two CR cable fixing plates, two tube fixing plates (C), and the tube guide fixing plate. 2. Remove the two center-most ink tube fixing devices (B); one for each set of ink pipes. Joint screw Tube guide fixing plate CR cable fixing plate NOTE: You need one black joint for each tube and pipe connection. If the replacement tubes do not come with the joints, make sure the joints stay in the screws on the pipe side. Tube fixing device B Tube fixing plate C Disassembly & Assembly 92
-
 1
1 -
2
-
3
-
4
-
5
-
6
-
7
-
8
-
9
-
10
-
11
-
12
-
13
-
14
-
15
-
16
-
17
-
18
-
19
-
20
-
21
-
22
-
23
-
24
-
25
-
26
-
27
-
28
-
29
-
30
-
31
-
32
-
33
-
34
-
35
-
36
-
37
-
38
-
39
-
40
-
41
-
42
-
43
-
44
-
45
-
46
-
47
-
48
-
49
-
50
-
51
-
52
-
53
-
54
-
55
-
56
-
57
-
58
-
59
-
60
-
61
-
62
-
63
-
64
-
65
-
66
-
67
-
68
-
69
-
70
-
71
-
72
-
73
-
74
-
75
-
76
-
77
-
78
-
79
-
80
-
81
-
82
-
83
-
84
-
85
-
86
-
 87
87 -
 88
88 -
 89
89 -
 90
90 -
 91
91 -
 92
92 -
 93
93 -
 94
94 -
 95
95 -
 96
96 -
 97
97 -
98
-
99
-
100
-
101
-
102
-
103
-
104
-
105
-
106
-
107
-
108
-
109
-
110
-
111
-
112
-
113
-
114
-
115
-
116
-
117
-
118
-
119
-
120
-
121
-
122
-
123
-
124
-
125
-
126
-
127
-
128
-
129
-
130
-
131
-
132
-
133
-
134
-
135
-
136
-
137
-
138
-
139
-
140
-
141
-
142
-
143
-
144
-
145
-
146
-
147
-
148
-
149
-
150
-
151
-
152
-
153
-
154
-
155
-
156
-
157
-
158
-
159
-
160
-
161
-
162
-
163
-
164
-
165
-
166
-
167
-
168
-
169
-
170
-
171
-
172
-
173
-
174
-
175
-
176
-
177
-
178
-
179
-
180
-
181
-
182
-
183
-
184
-
185
-
186
-
187
-
188
-
189
-
190
-
191
-
192
-
193
-
194
-
195
-
196
-
197
-
198
 |
 |