Epson Stylus Pro 9000 Service Manual - Page 131
Cutter Position Adjustment, If using cut sheets or narrow roll paper, you'll have
 |
View all Epson Stylus Pro 9000 manuals
Add to My Manuals
Save this manual to your list of manuals |
Page 131 highlights
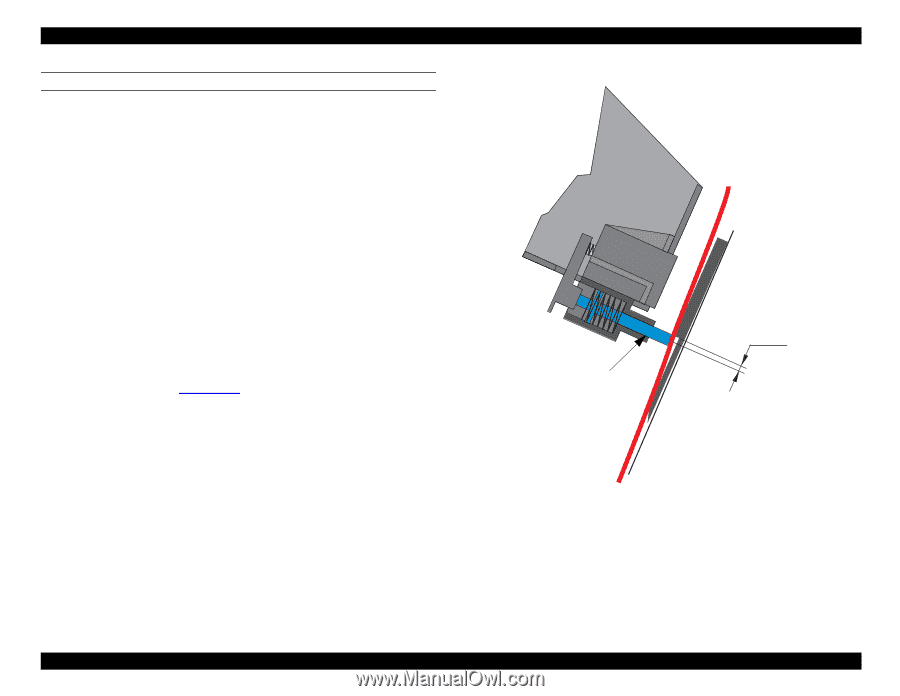
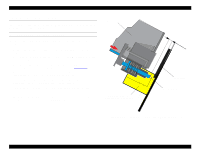
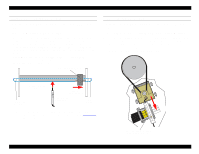
EPSON Stylus Pro 9000 CUTTER POSITION ADJUSTMENT Perform this adjustment whenever you remove the Lower Paper Guide. The upper part of the Lower Paper Guide (the Subplaten) and the Cutter must be aligned properly for the cutting operation to work. The position of the Lower Paper Guide is most likely to be correct if it's pushed all the way up during installation; but you still need to perform this adjustment as a check. 1. Load a sheet of paper in the printer and lock it in place by lowering the Paper Release Lever. NOTE: If using cut sheets or narrow roll paper, you'll have to perform this adjustment three times with the paper positioned on the left, right, and middle portions of the platen. 2. Release the Carriage Lock and slide the Carriage over to the edge of the paper. 3. While pressing the Cutter down by hand, move the Carriage across the paper to make a cut. 4. Measure the distance between the paper cut and the ridge of the Subplaten as shown in Figure 5-15. It should be approximately 0.02 inch (0.5 mm) all the way across. The acceptable distance is approximately 0.01-0.03 inch (0.5-0.7 mm). 5. If using cut sheets, be sure to perform the measurement at all three positions. 6. If the distance between the Cutter and the Subplaten is incorrect, loosen the screws securing the Lower Paper Guide, adjust its position, retighten the screws, and check the Cutter's operation again. 7. When done, return the carriage to home position. Carriage Paper Cutter 0.5mm Check the distance between the cut edge of the paper and the Subplaten's ridge. Figure 5-15. Cutter Position Check Adjustments 131
-
 1
1 -
2
-
3
-
4
-
5
-
6
-
7
-
8
-
9
-
10
-
11
-
12
-
13
-
14
-
15
-
16
-
17
-
18
-
19
-
20
-
21
-
22
-
23
-
24
-
25
-
26
-
27
-
28
-
29
-
30
-
31
-
32
-
33
-
34
-
35
-
36
-
37
-
38
-
39
-
40
-
41
-
42
-
43
-
44
-
45
-
46
-
47
-
48
-
49
-
50
-
51
-
52
-
53
-
54
-
55
-
56
-
57
-
58
-
59
-
60
-
61
-
62
-
63
-
64
-
65
-
66
-
67
-
68
-
69
-
70
-
71
-
72
-
73
-
74
-
75
-
76
-
77
-
78
-
79
-
80
-
81
-
82
-
83
-
84
-
85
-
86
-
87
-
88
-
89
-
90
-
91
-
92
-
93
-
94
-
95
-
96
-
97
-
98
-
99
-
100
-
101
-
102
-
103
-
104
-
105
-
106
-
107
-
108
-
109
-
110
-
111
-
112
-
113
-
114
-
115
-
116
-
117
-
118
-
119
-
120
-
121
-
122
-
123
-
124
-
125
-
 126
126 -
 127
127 -
 128
128 -
 129
129 -
 130
130 -
 131
131 -
 132
132 -
 133
133 -
 134
134 -
 135
135 -
 136
136 -
137
-
138
-
139
-
140
-
141
-
142
-
143
-
144
-
145
-
146
-
147
-
148
-
149
-
150
-
151
-
152
-
153
-
154
-
155
-
156
-
157
-
158
-
159
-
160
-
161
-
162
-
163
-
164
-
165
-
166
-
167
-
168
-
169
-
170
-
171
-
172
-
173
-
174
-
175
-
176
-
177
-
178
-
179
-
180
-
181
-
182
-
183
-
184
-
185
-
186
-
187
-
188
-
189
-
190
-
191
-
192
-
193
-
194
-
195
-
196
-
197
-
198
 |
 |