Epson Stylus Pro 9000 Service Manual - Page 140
Checking Maintenance Counters, 6.4.2 Clearing Maintenance Counters
 |
View all Epson Stylus Pro 9000 manuals
Add to My Manuals
Save this manual to your list of manuals |
Page 140 highlights
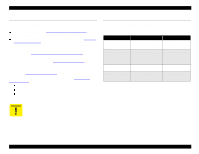
EPSON Stylus Pro 9000 6.4.1 Checking Maintenance Counters You can check the printer's maintenance counters in two ways: Using the Printer Status Menu This is by far the easier method, but it's less precise. To view the Printer Status Menu, press the SelecType button when the printer is turned on but not printing. Press it repeatedly until "Printer Status Menu" appears on the LCD display. Then press the Item button to view the status of the parts listed below: Table 6-3. Printer Status Menu Message Description VERSION Shows the firmware version INK LEFT-K Amount of black ink remaining INK LEFT-C Amount of cyan ink remaining INK LEFT-M Amount of magenta ink remaining INK LEFT-LC Amount of light cyan ink remaining INK LEFT-LM Amount of light magenta ink remaining INK LEFT-Y Amount of yellow ink remaining CUTTER LIFE Useful remaining life of the cutter remaining PAGE COUNT Total number of printed documents; displays in standard decimal notation INK PAD Useful remaining life of the Waste Ink Pads CR MOTOR Useful remaining life of the Carriage motor PF MOTOR Useful remaining life of the Paper feed motor HEAD UNIT Useful remaining life of the Printheads CLEANER Useful remaining life of the Printhead Cleaner Blade The indicators read as follows: E *****F = full life remaining E ****F = ¾ life remaining E ***F = ½ life remaining E **F = ¼ life remaining E *F = nearly used up E F = fully used up Example: new Waste Ink Pads display as E*****F and fully used ones as E F. Using the Self-Diagnostic Mode In the Self-Diagnostic Mode, you can view most of the maintenance records described above as well as others. The records display as a precise number, but you have to convert the number from hexadecimal to standard decimal notation, which is a hassle. The easiest way to do this is to use a calculator, such as the Calculator utility that comes with Windows. To view the maintenance records, enter the Test\Elec. menu in the SelfDiagnostic Mode. For more information on the Self-Diagnostic Mode, see Using the Self-Diagnostic Mode on page 108. 6.4.2 Clearing Maintenance Counters After you replace a part that's monitored by a counter, you need to clear or reset its counter. See Service Parts & Required Adjustments on page 103 for detailed instructions on which counters you need to clear after replacing certain parts. This printer provides various ways of clearing its counters: from the Self-Diagnostics Mode from Maintenance Mode 2 See Table 6-4 on page 141 for a summary of the counters that can be cleared in each mode. To reset the Initial Ink Charge Flag, use the Parameter\Update\Ink Parameter menu in the Self-Diagnostics Mode. See Parameter menu on page 129. Maintenance 140
-
 1
1 -
2
-
3
-
4
-
5
-
6
-
7
-
8
-
9
-
10
-
11
-
12
-
13
-
14
-
15
-
16
-
17
-
18
-
19
-
20
-
21
-
22
-
23
-
24
-
25
-
26
-
27
-
28
-
29
-
30
-
31
-
32
-
33
-
34
-
35
-
36
-
37
-
38
-
39
-
40
-
41
-
42
-
43
-
44
-
45
-
46
-
47
-
48
-
49
-
50
-
51
-
52
-
53
-
54
-
55
-
56
-
57
-
58
-
59
-
60
-
61
-
62
-
63
-
64
-
65
-
66
-
67
-
68
-
69
-
70
-
71
-
72
-
73
-
74
-
75
-
76
-
77
-
78
-
79
-
80
-
81
-
82
-
83
-
84
-
85
-
86
-
87
-
88
-
89
-
90
-
91
-
92
-
93
-
94
-
95
-
96
-
97
-
98
-
99
-
100
-
101
-
102
-
103
-
104
-
105
-
106
-
107
-
108
-
109
-
110
-
111
-
112
-
113
-
114
-
115
-
116
-
117
-
118
-
119
-
120
-
121
-
122
-
123
-
124
-
125
-
126
-
127
-
128
-
129
-
130
-
131
-
132
-
133
-
134
-
 135
135 -
 136
136 -
 137
137 -
 138
138 -
 139
139 -
 140
140 -
 141
141 -
 142
142 -
 143
143 -
 144
144 -
 145
145 -
146
-
147
-
148
-
149
-
150
-
151
-
152
-
153
-
154
-
155
-
156
-
157
-
158
-
159
-
160
-
161
-
162
-
163
-
164
-
165
-
166
-
167
-
168
-
169
-
170
-
171
-
172
-
173
-
174
-
175
-
176
-
177
-
178
-
179
-
180
-
181
-
182
-
183
-
184
-
185
-
186
-
187
-
188
-
189
-
190
-
191
-
192
-
193
-
194
-
195
-
196
-
197
-
198
 |
 |
