Epson Stylus Pro User Manual - Birmy Mac - Page 10
Quick Start
 |
View all Epson Stylus Pro manuals
Add to My Manuals
Save this manual to your list of manuals |
Page 10 highlights
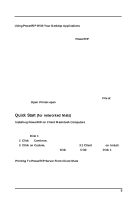
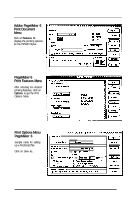
Introduction/lnstallation Using PowerRIP With Your Desktop Applications 1. If your Mac has sufficient RAM, you may keep PowerRIP open in the background while you work in other applications. If you don't have enough RAM (your Mac will tell you so), you must quit PowerRIP. 2. When setting up your documents, be sure to consider the printable area of your Epson Stylus. Minimum margins can be viewed in Page Setup menus. 3. You cannot print directly to PowerRIP unless you have multiple networked Mats. Instead you must create a PostScript file (save to disk), an option available in all PostScript applications. PostScript files should be saved to the printer queue folder you created inside the PowerRIP 3.1 folder. If you saved the PostScript file to some other destination, you can drag and drop it into the proper printer queue folder. Don't save jobs to the Printed Jobs folder inside the printer queue; jobs reside there after they have printed. 4. When you print a job and PowerRIP is open in the background, your job will start processing as soon as it gets to the printer queue. If you had to quit PowerRIP because of low memory, use the following instructions: After the PostScript file has been sent to the printer queue, quit the application, launch PowerRIP, and open the printer you previously created (under File at top select Open Printer-open the printer queue folder and double click on the printer icon). Your job will process and print after the printer starts your job. Quick Start (for networked Mats) Installing PowerRIP on Client Macintosh Computers Any networked Macintosh can be used as a client. See note on page 2 if you have less than 8 MB of RAM. 1. Insert Disk 1 and double click on installer icon. 2. Click on Continue. 3. Click on Custom, then highlight PowerRIP 3.1 Client and click on Install. 4. Follow the prompts to insert Disk 2 through Disk 4, and then Disk 1 again. When the installation is complete, click OK and eject Disk 1. Printing To PowerRIP Server From Client Mats A Client is any Macintosh connected to the Server Macintosh via AppleTalk or Ethertalk. When the PowerRIP Control Panel and a printer are open on a server Mac, you will see the name of your printer in the Chooser of a client Mac. Select the proper PPD as in previous instructions and print directly to the printer; there is no need to create a PostScript file. Bit-my Graphics Corporation 5
-
 1
1 -
2
-
3
-
4
-
 5
5 -
 6
6 -
 7
7 -
 8
8 -
 9
9 -
 10
10 -
 11
11 -
 12
12 -
 13
13 -
 14
14 -
 15
15 -
16
-
17
-
18
-
19
-
20
-
21
-
22
-
23
-
24
-
25
-
26
-
27
-
28
-
29
-
30
-
31
-
32
-
33
-
34
-
35
-
36
-
37
-
38
-
39
-
40
-
41
-
42
-
43
-
44
 |
 |