Epson Stylus Pro User Manual - Birmy Mac - Page 12
Print Menu Options, Most Applications, Creating PostScript, File Most Applications
 |
View all Epson Stylus Pro manuals
Add to My Manuals
Save this manual to your list of manuals |
Page 12 highlights
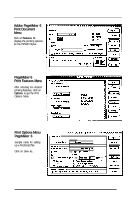
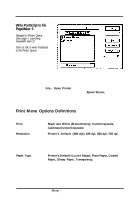
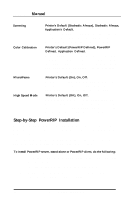
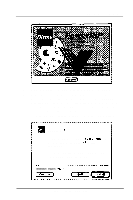
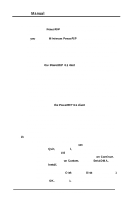
Introductionhs tallation Print Menu (Options) Most Applications Me: To get this menu in PageMaker 5 hold down the Opt/on key before pulling down F//e and selecting Print. Optimum settings for 360 dpi output on coated paper are shown See page 9 for explanation of options in this menu Click on OK then on Save Priniec "Epson Slylur" c0Pl.f:~ Pages: 0 fill PfhlS Ogllont Couer Page: 8 None OEefore ORfler Ocmumenl Prlnl:l Callbreled Colorl6royrcele 'I PostScript"' trrorr: No Special Rspcwting 7 ( Note: Scroll down to select all options Creating PostScript File (Most Applications) Navigate to Printer Queue (See page 4, launching PowerRlP, item 2) ~CMSlhdOnk Name of job t .ps (Use alphanumeric characters, i.e. abc123 and period) 1 Format: PostScript Job - Select Binary and Level 2 Only -W Select All t Click on Save 0 RSCII @ BIWJQJ 0 Lwel I Compatlbla Q LoVeI 2 Only Font lncluslon:~ The PostScript file will be written to the Printer Queue. If PowerRIP is open in the background, the job will start to process and print. If PowerRIP is not open, double click on the PowerRIP icon in the PowerRIP 3.1 folder. When the PowerRIP Control Panel opens, select File... Open Printer and navigate to the Printer Queue folder (in this example, Epson Stylus). Double click on Epson Stylus; the job is processed and then the printer begins printing your file. Birmy Graphics Corporation 7
-
 1
1 -
2
-
3
-
4
-
5
-
6
-
 7
7 -
 8
8 -
 9
9 -
 10
10 -
 11
11 -
 12
12 -
 13
13 -
 14
14 -
 15
15 -
 16
16 -
 17
17 -
18
-
19
-
20
-
21
-
22
-
23
-
24
-
25
-
26
-
27
-
28
-
29
-
30
-
31
-
32
-
33
-
34
-
35
-
36
-
37
-
38
-
39
-
40
-
41
-
42
-
43
-
44
 |
 |
