Fujitsu T4220 T4220 User's Guide - Page 108
Procedure - system extension utility
 |
View all Fujitsu T4220 manuals
Add to My Manuals
Save this manual to your list of manuals |
Page 108 highlights
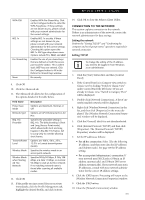
LifeBook T4200 Series Tablet PC - Appendix A 9. The Mandatory Access Point option is only used if Infrastructure mode is selected. Use this option to connect to a specific access point. Enter the MAC address for the access point. Click OK to save the setting and return to the General Settings page. 10. Click [Next]. 11. If you are using Cisco CCX, click Cisco Options to enable Cisco CKIP data encryption on the Security Settings page. Check the Cisco Compatible Extensions Options. If you have checked the Cisco's "Mixed-Cell" box in the Advanced Setting, this option must also be checked. 12. Click [OK]. 13. Click Next. 14. Select Open, Shared, WPA-Enterprise, WPA2Enterprise, WPA-Personal, or WPA2-Personal in the Network Authentication options. 15. Select either None, WEP, CKIP (if Enable Cisco Client eXtentions is enabled, use CKIP or WEP), or TKIP for the data encryption. 16. If WEP is selected, select either 64 or 128-bit for the Encryption Level. 17. Select the key index 1, 2, 3 or 4. 18. Enter the WEP key if required. If your network does not employ a 802.1x/EAP security mechanism, please skip to step 24. 19. Click the Enable 802.1x checkbox to enable the 802.1x security option. Please contact your network administrator if configuration of this setting is required. 20. Select the appropriate Authentication Type. Please contact your network administrator if configuration of this setting is required. 21. After selecting your authentication type, enter the user name, domain, and password of the user you have created on the authentication server. The user name and password do not have to be the same as name and password of your current Windows user login. 22. Click [OK] to save the settings. 23. From the Intel ProSet Wireless page, click the new profile name shown in the Profile List. Use the up and down arrows to position the priority of the new profile in the priority list. 24. Click the Connect button to connect to the network. 25. Click [Close] if you want to close the Intel PROSet for Wireless window. Configuring Using Atheros Client Utility Software This section explains the procedure to properly configure the WLAN device using the Atheros Client Utility. Pre-defined parameters will be required for this procedure. Please consult with your network administrator for these parameters: Network Name - Also known as the SSID Network Key (WEP) - Required if using static WEP keys. Authentication Type - Open, Shared, WPA, or WPAPSK Procedure 1. Activate the WLAN device using either the Wireless On/Off Switch or the Atheros Client Utility 2. Right-click on the "Atheros Client Utility" icon in the system tray, and select "Open Atheros Client Utility" from the menu. 3. From the Current Status page, click the Profile Management tab. 4. If this is your first time using this utility, highlight the profile [Default] and Click the [Modify] button, otherwise Click the [New] button. The General Settings dialog displays. 5. From the General page, enter a profile name in the Profile Name field. 6. Enter the network SSID, in the SSID1 field. If you wish to create a profile that can connect to up to 3 different wireless networks, SSID's can be entered in the SSID2 and SSID3 fields as well. 7. Click the Security tab. 8. The Security tab allows for the configuration of the Security modes listed in the table below. Please select the radio button of the desired security mode. If these settings are not known to you, please consult with your network administrator for the correct settings. Field Name WPA Description Enables the use of Wi-Fi Protected Access. Choosing WPA opens the WPA EAP drop-down menu. Options include TLS and PEAP. If these settings are not known to you, please consult with your network administrator for the correct settings. 100
-
 1
1 -
2
-
3
-
4
-
5
-
6
-
7
-
8
-
9
-
10
-
11
-
12
-
13
-
14
-
15
-
16
-
17
-
18
-
19
-
20
-
21
-
22
-
23
-
24
-
25
-
26
-
27
-
28
-
29
-
30
-
31
-
32
-
33
-
34
-
35
-
36
-
37
-
38
-
39
-
40
-
41
-
42
-
43
-
44
-
45
-
46
-
47
-
48
-
49
-
50
-
51
-
52
-
53
-
54
-
55
-
56
-
57
-
58
-
59
-
60
-
61
-
62
-
63
-
64
-
65
-
66
-
67
-
68
-
69
-
70
-
71
-
72
-
73
-
74
-
75
-
76
-
77
-
78
-
79
-
80
-
81
-
82
-
83
-
84
-
85
-
86
-
87
-
88
-
89
-
90
-
91
-
92
-
93
-
94
-
95
-
96
-
97
-
98
-
99
-
100
-
101
-
102
-
 103
103 -
 104
104 -
 105
105 -
 106
106 -
 107
107 -
 108
108 -
 109
109 -
 110
110 -
 111
111 -
 112
112 -
 113
113 -
114
-
115
-
116
-
117
-
118
-
119
-
120
-
121
-
122
-
123
-
124
-
125
-
126
-
127
-
128
-
129
-
130
-
131
-
132
-
133
-
134
-
135
-
136
 |
 |