Garmin Edge 510 Owner's Manual - Page 5
Getting Started, Charging the Device, Installing the Standard Mount, Installing the Out-Front Mount - gps
 |
View all Garmin Edge 510 manuals
Add to My Manuals
Save this manual to your list of manuals |
Page 5 highlights
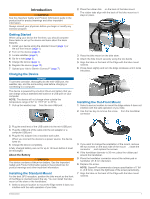
Introduction WARNING See the Important Safety and Product Information guide in the product box for product warnings and other important information. Always consult your physician before you begin or modify any exercise program. Getting Started When using your device the first time, you should complete these tasks to set up the device and learn about the basic features. 1 Install your device using the standard mount (page 1) or the out-front mount (page 1). 2 Turn on the device (page 2). 3 Locate satellites (page 2). 4 Go for a ride (page 3). 5 Charge the device (page 1). 6 Register the device (page 12). 7 Upload your ride to Garmin Connect™ (page 7). Charging the Device NOTICE To prevent corrosion, thoroughly dry the mini-USB port, the weather cap, and the surrounding area before charging or connecting to a computer. The device is powered by a built-in lithium-ion battery that you can charge using a standard wall outlet or a USB port on your computer. NOTE: The device will not charge when outside the temperature range of 32° to 113°F (0° to 45°C). 1 Pull up the weather cap À from the mini-USB port Á. 2 Place the rubber disk À on the back of the bike mount. The rubber tabs align with the back of the bike mount so it stays in place. 3 Place the bike mount on the bike stem. 4 Attach the bike mount securely using the two bands Á. 5 Align the tabs on the back of the Edge with the bike mount notches Â. 6 Press down slightly and turn the Edge clockwise until it locks into place. Installing the Out-Front Mount 1 Select a secure location to mount the Edge where it does not interfere with the safe operation of your bike. 2 Use the hex key to remove the screw À from the handlebar connector Á. 2 Plug the small end of the USB cable into the mini-USB port. 3 Plug the USB end of the cable into the AC adapter or a computer USB port. 4 Plug the AC adapter into a standard wall outlet. When you connect the device to a power source, the device turns on. 5 Charge the device completely. A fully charged battery can run for up to 15 hours before it must be recharged. About the Battery WARNING This device contains a lithium-ion battery. See the Important Safety and Product Information guide in the product box for product warnings and other important information. Installing the Standard Mount For the best GPS reception, position the bike mount so the front of the Edge is oriented toward the sky. You can install the bike mount on the stem or the handlebars. 1 Select a secure location to mount the Edge where it does not interfere with the safe operation of your bike. 3 If you want to change the orientation of the mount, remove the two screws on the back side of the mount Â, rotate the connector Ã, and replace the screws. 4 If the handlebar diameter is 26 mm, place the rubber pad around the handlebar. 5 Place the handlebar connector around the rubber pad or handlebar (31. 8 mm diameter). 6 Replace the screw. NOTE: Garmin® recommends a torque specification of 7 lbfin. (0. 8 N-m). Check the tightness of the screw periodically. 7 Align the tabs on the back of the Edge with the bike mount notches Ä. Introduction 1
-
 1
1 -
 2
2 -
 3
3 -
 4
4 -
 5
5 -
 6
6 -
 7
7 -
 8
8 -
 9
9 -
 10
10 -
 11
11 -
12
-
13
-
14
-
15
-
16
-
17
-
18
-
19
-
20
 |
 |
