Gigabyte GA-X79-UD5 User Manual - Page 15
Installing the CPU Cooler, screw driver. Begin tightening a screw with a few - drivers
 |
View all Gigabyte GA-X79-UD5 manuals
Add to My Manuals
Save this manual to your list of manuals |
Page 15 highlights
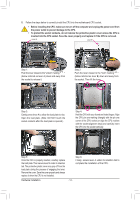
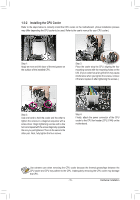
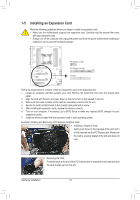
1-3-2 Installing the CPU Cooler Refer to the steps below to correctly install the CPU cooler on the motherboard. (Actual installation process may differ depending the CPU cooler to be used. Refer to the user's manual for your CPU cooler.) Step 1: Apply an even and thin layer of thermal grease on the surface of the installed CPU. Step 2: Place the cooler atop the CPU, aligning the four mounting screws with the mounting holes on the ILM. (If your cooler has a fan grill which may cause interference when you tighten the screws, remove it first and replace it after tightening the screws.) Step 3: Use one hand to hold the cooler and the other to tighten the screws in a diagonal sequence with a screw driver. Begin tightening a screw with a few turns and repeat with the screw diagonally opposite the one you just tightened. Then do the same to the other pair. Next, fully tighten the four screws. Step 4: Finally, attach the power connector of the CPU cooler to the CPU fan header (CPU_FAN) on the motherboard. Use extreme care when removing the CPU cooler because the thermal grease/tape between the CPU cooler and CPU may adhere to the CPU. Inadequately removing the CPU cooler may damage the CPU. - 15 - Hardware Installation
-
 1
1 -
2
-
3
-
4
-
5
-
6
-
7
-
8
-
9
-
 10
10 -
 11
11 -
 12
12 -
 13
13 -
 14
14 -
 15
15 -
 16
16 -
 17
17 -
 18
18 -
 19
19 -
 20
20 -
21
-
22
-
23
-
24
-
25
-
26
-
27
-
28
-
29
-
30
-
31
-
32
-
33
-
34
-
35
-
36
-
37
-
38
-
39
-
40
-
41
-
42
-
43
-
44
-
45
-
46
-
47
-
48
-
49
-
50
-
51
-
52
-
53
-
54
-
55
-
56
-
57
-
58
-
59
-
60
-
61
-
62
-
63
-
64
-
65
-
66
-
67
-
68
-
69
-
70
-
71
-
72
-
73
-
74
-
75
-
76
-
77
-
78
-
79
-
80
-
81
-
82
-
83
-
84
-
85
-
86
-
87
-
88
-
89
-
90
-
91
-
92
-
93
-
94
-
95
-
96
-
97
-
98
-
99
-
100
-
101
-
102
-
103
-
104
-
105
-
106
-
107
-
108
-
109
-
110
-
111
-
112
-
113
-
114
-
115
-
116
 |
 |
