Gigabyte X299 AORUS Gaming 7 Pro Users Manual - Page 28
Internal Connectors, M2P_32G/M2M_32G/M2Q_32G
 |
View all Gigabyte X299 AORUS Gaming 7 Pro manuals
Add to My Manuals
Save this manual to your list of manuals |
Page 28 highlights
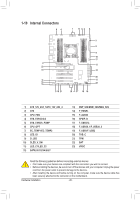
1-10 Internal Connectors 84 1 11 6 3 5 7 2 4 18 17 4 13 22 13 12 20 11 13 16 15 23 9 10 21 19 4 5 7 18 14 1) ATX_12V_2X4_1/ATX_12V_2X4_2 2) ATX 3) CPU_FAN 4) SYS_FAN1/2/3/4 5) SYS_FAN5/6_PUMP 6) CPU_OPT 7) EC_TEMP1/EC_TEMP2 8) LED_IO 9) D_LED 10) DLED_V_SW 11) LED_C1/LED_C2 12) SATA3 0/1/2/3/4/5/6/7 13) M2P_32G/M2M_32G/M2Q_32G 14) F_PANEL 15) F_AUDIO 16) SPDIF_O 17) F_USB31C 18) F_USB30_1/F_USB30_2 19) F_USB1/F_USB2 20) THB_C 21) TPM 22) BAT 23) VROC Read the following guidelines before connecting external devices: •• First make sure your devices are compliant with the connectors you wish to connect. •• Before installing the devices, be sure to turn off the devices and your computer. Unplug the power cord from the power outlet to prevent damage to the devices. •• After installing the device and before turning on the computer, make sure the device cable has been securely attached to the connector on the motherboard. Hardware Installation - 28 -
-
 1
1 -
2
-
3
-
4
-
5
-
6
-
7
-
8
-
9
-
10
-
11
-
12
-
13
-
14
-
15
-
16
-
17
-
18
-
19
-
20
-
21
-
22
-
 23
23 -
 24
24 -
 25
25 -
 26
26 -
 27
27 -
 28
28 -
 29
29 -
 30
30 -
 31
31 -
 32
32 -
 33
33 -
34
-
35
-
36
-
37
-
38
-
39
-
40
-
41
-
42
-
43
-
44
-
45
-
46
-
47
-
48
-
49
-
50
-
51
-
52
-
53
-
54
-
55
-
56
-
57
-
58
-
59
-
60
-
61
-
62
-
63
-
64
-
65
-
66
-
67
-
68
-
69
-
70
-
71
-
72
-
73
-
74
-
75
-
76
-
77
-
78
-
79
-
80
-
81
-
82
-
83
-
84
-
85
-
86
-
87
-
88
-
89
-
90
-
91
-
92
-
93
-
94
-
95
-
96
-
97
-
98
-
99
-
100
-
101
-
102
-
103
-
104
-
105
-
106
-
107
-
108
-
109
-
110
-
111
-
112
-
113
-
114
-
115
-
116
-
117
-
118
-
119
-
120
-
121
-
122
-
123
-
124
-
125
-
126
-
127
-
128
-
129
-
130
-
131
-
132
-
133
-
134
-
135
-
136
-
137
-
138
-
139
-
140
-
141
-
142
-
143
-
144
-
145
-
146
-
147
-
148
-
149
-
150
-
151
-
152
 |
 |
