Haier LY26R3A User Manual - Page 3
Get To Know Your Tv With Dvd
 |
View all Haier LY26R3A manuals
Add to My Manuals
Save this manual to your list of manuals |
Page 3 highlights
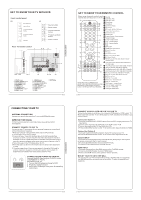
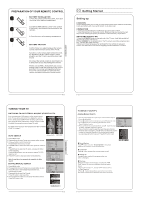
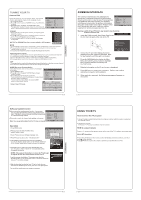
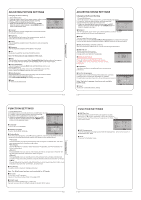
GET TO KNOW YOUR TV WITH DVD Front control panel Source button Menu button Volume up/down button Program up/down button Power button Rear Terminals Control ANT IN USB 2 1REC COMPONENT IN HDMI3 VGA IN 1. YPbPr input 2. YPbPr AUDIO input 3. DVI AUDIO input 4. ANTENNA input 5. HDMI3 input 6. S-VIDEO input 7. EARPHONE output 8. HDMI1 input 9. HDMI2 input 10.AV-VIDEO input 11. Common Interface 12.SCART1 input 13.VGA AUDIO input 14.SCART2 input 15.VGA input 16.USB 17.OPTICAL GET TO KNOW YOUR REMOTE CONTROL When using the remote control, aim it towards the remote sensor on the TV . SCREEN STOP NOTE:RED button ,GREEN button BLUE button and YELLOW button are fast text button in analog signal .Function button in DVBT (just reference the OSD) Stand By DVD Menu / REC DVD open / close Picture Mode Sound Mode Call Screen Display Sleep button DTV Audio / NICAM / DVD Audio Aspect Ratio Control button Channel list button Subtitle button Program Number Channel selection Source Exchange Q.VIEW / Swap Channel V+/V- : Volume selection P+/P-: Channel selection Mute Menu button GUIDE button (only for DTV) Favourite list button OK button Cursor Mover button Back button (only for USB) Exit Screen Display REPEAT (only for DVD , USB , REC & Timeshift) / CANCEL button Zoom (only for DVD &USB)/Teletext index(only for TV) / REC index Play / Pause button (only for DVD &USB) / Timeshift Stop (only for DVD, USB, REC & Timeshift) Fast Reverse (only for DVD, USB, REC & Timeshift) Fast Forward (only for DVD, USB, REC & Timeshift) Previous (only for DVD, USB, REC & Timeshift) Next (only for DVD, USB, REC & Timeshift) DVD Set up / Text DVD Title / Teletext Mix DVD Search / Teletext Subcode DVD 10+ / Teletext Hold DVD Program / Teletext Reveal DVD A-B Repeat / Teletext Size DVD Call / Teletext Mode DVD Angle /Teletext Time CONNECTING YOUR TV ANTENNA CONNECTION Connect your aerial to the side of the TV into the ANTENNA IN socket. IMPROVE YOUR SIGNAL To improve picture quality in a poor signal area, use a signal amplifier (not supplied). CONNECT YOUR PC TO THE TV You can use your TV as a monitor for your personal computer by connecting it with a VGAcable (not supplied). 1.Read your computer user guide and check it has a VGAconnector. 2.Turn the power off on your TV and PC. 3.Connect a D type 15-pin VGA interface cable to the VGA video interface connector on the PC. Connect the other end of the cable to the PC interface connector on the TV. Tighten the screws on the VGA connectors and connect the audio cable (not supplied) to the audio input socket on the back of the TV. 4.Turn on the power of the TV firstly and then the PC. 5.Press the button on the TV or TV remote control to set the video input mode to VGA. 6. Once the image shows, if there is noise present, change the VGA mode to another resolution, change the refresh rate to another rate or adjust the brightness and contrast on the menu until the picture is clear. L R Y Pb Pr DVD CONNECT A DVD PLAYER TO YOUR TV Connect the DVD video outputs (Y, Pb, Pr) to the COMPONENT (Y, Pb, Pr) IN socket on your TV. 1 . Turn on the DVD player and insert a DVD. 2 . Press the button to select . 3 . Refer to the DVD player user guide for operating instructions. CONNECT A DVD PLAYER OR VCR TO YOUR TV There are two ways in which you can connect a DVD player or VCR to your TV. Make sure that both the TV and DVD player or VCR are switched off before you connect them. Connection Option 1 1.Connect the audio and S-VIDEO cables from the VCR output jacks to the TV input jacks. 2.Insert a video tape into the VCR and press PLAY on the VCR. 3.Turn on the power of the TV first, then the VCR. 4.Press the SOURCE button on the TV to set the video input mode to S-VIDEO. Connection Option 2 1.Connect the AV DVD/VCR outputs to the AV IN socket on your TV. 2.Press the SOURCE button on the TV to set the video input mode to AV. SCART INPUT 1.Connect the scart lead from the external device (DVD player, Set-top box or games console) to the TV scart socket. 2.Press the SOURCE button to select SCART mode. 3.Press the PLAY button on the external device. HDMI INPUT 1.Connect the cable from the HDMI device to the TV HDMI socket. 2.Press the SOURCE button to select HDMI mode. 3.Refer to the HDMI device user guide for how to operate. MOUNT YOUR TV ONTO THE WALL You can mount your TV onto the wall by using a wall bracket (not supplied). Use M4/M6 machine screws (4 pcs) to screw the TV onto the bracket (not supplied).
-
 1
1 -
 2
2 -
 3
3 -
 4
4 -
 5
5 -
 6
6 -
 7
7 -
 8
8 -
 9
9 -
10
-
11
-
12
-
13
-
14
-
15
-
16
-
17
-
18
-
19
-
20
-
21
-
22
-
23
-
24
-
25
-
26
-
27
-
28
-
29
-
30
-
31
-
32
-
33
-
34
-
35
-
36
-
37
-
38
-
39
-
40
-
41
-
42
-
43
-
44
-
45
-
46
-
47
-
48
-
49
-
50
-
51
-
52
-
53
-
54
-
55
-
56
-
57
-
58
-
59
-
60
 |
 |
