Haier LY26R3A User Manual - Page 6
Adjusting Picture Settings, Adjusting Sound Settings, Function Settings
 |
View all Haier LY26R3A manuals
Add to My Manuals
Save this manual to your list of manuals |
Page 6 highlights
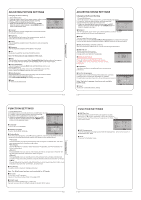
ADJUSTING PICTURE SETTINGS Changing the Picture Setting 1. Press MENU button. 2. Press button to select Picture menu, press button to enter. Menu 3. Press button to select the item requires adjusting. 4. Press button to adjust the selection item. 5. When you are satisfied with your choice, press the EXIT button to return to normal viewing or press MENU button to return to the previous menu. OK Contrast This will adjust the intensity of bright parts in the picture but keep the dark parts unchanged. Brightness This will adjust the light output of the complete picture, which will mainly affect the darker areas of the picture. Colour This will adjust the saturation level of the colours to suit your personal preference. Sharpness This will adjust the sharpness of fine details in the picture. Tint Allows you to select the colour mix (Tint) of the picture. Note: The Tint function is only available in NTSC mode. Mode This will select the picture mode. Select Standard/Mild/User/Vivid according to the program. You can quickly select the desired mode by P.MODE button on the remote control. Colour temperature This will increase or decrease Warm (red) and Cool (blue) colours to suit personal preferences. Select Cool to give the white colour a blue tint, Normal to give the white colour a neutral tint, Warm to give the white colour a red tint. Noise Reduction Automatically filters out and reduces the image noise and improves picture quality when receiving weak video signals. Select Off/Low/Standard/High according to the image noise. Reset To recover to the default value. ADJUSTING SOUND SETTINGS Changing the Sound Setting 1. Press MENU button. 2. Press button to select Sound menu, press button to enter. 3. Press button to select the item requires adjusting. Menu 4. Press button to adjust the selection item. 5. When you are satisfied with your choice, press the EXIT button to return to normal viewing or press MENU button to return to the previous menu. Balance Mode AVL SRS TS XT < >0 < Standard > < Off > < Off > Digital Audio Output< Off > Equalizer OK Audio Languages OK English Reset OK Balance Picture Sound Tuning Function Time Lock This will adjust the output of the right and left speakers to obtain the best stereo reproduction for your listening position. Mode This will select the sound mode. Press button to select Standard/Music/Theater/User according to the program. You can quickly select the desired mode by S.MODE button on the remote control. AVL (Automatic volume control) This will reduces the differences in volume level among broadcasters. SRS TS XT This will control the Woofer output. Press button to select SRS TS XT. Press button to set SRS TS XT as OFF, ON. Digital Audio Output This will control the Digital Audio Output. Press button to select Digital Audio Output., Press button to set Digital Audio Output. as OFF, PCM,RAW. Menu Equalizer This sound setting can be adjusted to suit your personal preference. Audio Languages Press button to select Primary/Secondary item, and then press button to select the languages you needed. Press button to select Close item, Press OK button to close it. Note: The Audio Language function is only available in DTV mode. Reset To recover to the default menu setting. Menu Balance Mode AVL SRS TS XT < >0 < Standard > < Off > < Off > Digital Audio Output< Off > Equalizer OK Audio Languages OK English Reset OK Picture Sound Tuning Function Time Lock FUNCTION SETTINGS 1. Press MENU button. 2. Press button to select Sound menu, press button to enter. 3. Press button to select the item requires adjusting. 4. Press button to adjust the selection item. Menu 5. When you are satisfied with your choice, press the EXIT OK button to return to normal viewing or press MENU button OK to return to the previous menu. OK Language To select the menu language. Menu OK Subtitle Language To select the Subtitle language. OK Display Mode To set the picture proportion, press button to select 4:3/Zoom1/Zoom2/Wide/16:9/Auto. You can quickly select the desired mode by ARC button on the remote control. 4:3 mode Choose 4:3 when you want to view a picture with an original 4:3 aspect ratio, with gray bars appearing at both the left and right sides. 16:9 mode Choose 16:9 when you want to adjust the picture horizontally, in a linear proportion to fill the entire screen. Zoom1 Choose Zoom1 when you want to view the picture without any alteration. However, the top and bottom portions of the picture will be cropped. Zoom2 Choose Zoom2 when you want the picture to be altered, both vertically extended and cropped. The picture taking a halfway trade off between alteration and screen coverage. Wide Choose Wide when you want to adjust the picture in a non-linear proportion, that is, more enlarged at top sides and no alteration, at bottom side. Blue Screen This will select the character background colour. Note: The Blue Screen function is only available for ATV mode. Recorder To recorder the DTV program. Details of Recorder are described in the page of 38. SCART Input When you use the SCART2 input ,make sure the input source is AV or S-VIDEO,and set the SCART INPUT option. FUNCTION SETTINGS OSD Time Out To s et how long you want the menus to appear on-screen. Each press of button repeatedly to select the number of preset minutes, the Time will be set in sequence: off,10sec,15sec, 30sec,45sec,60sec. Menu OK OK OK OSD Transparency To set the transparency background of OSD,thetransparency will be set in sequence: Off,25%,50%,75%,100%. Reset To recover to the default value.
-
 1
1 -
 2
2 -
 3
3 -
 4
4 -
 5
5 -
 6
6 -
 7
7 -
 8
8 -
 9
9 -
 10
10 -
 11
11 -
 12
12 -
13
-
14
-
15
-
16
-
17
-
18
-
19
-
20
-
21
-
22
-
23
-
24
-
25
-
26
-
27
-
28
-
29
-
30
-
31
-
32
-
33
-
34
-
35
-
36
-
37
-
38
-
39
-
40
-
41
-
42
-
43
-
44
-
45
-
46
-
47
-
48
-
49
-
50
-
51
-
52
-
53
-
54
-
55
-
56
-
57
-
58
-
59
-
60
 |
 |
