Haier LY26R3A User Manual - Page 4
Getting Started - tv
 |
View all Haier LY26R3A manuals
Add to My Manuals
Save this manual to your list of manuals |
Page 4 highlights
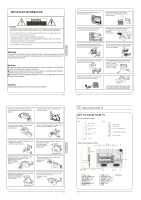
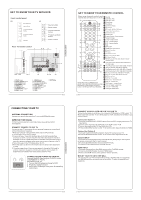
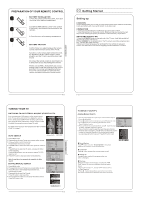
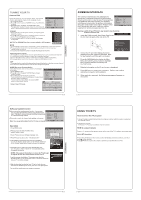
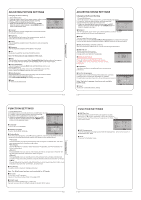
PREPARATION OF YOUR REMOTE CONTROL BATTERY INSTALLATION 1.Place the remote control face down, then open the cover of the battery compartment. 2.Install two AAA batteries. (The + and- symbol of the battery must match with the marks on the remote). 3.Close the cover of the battery compartment. BATTERY CAUTION Confirm there is no object between the remote control and the remote sensor of the TV set. Sunshine or other strong light will interfere with the signal sent by the remote control. In this situation turn the TV set to avoid the direct light source. Do not put the remote control in direct heat or in a damp place as you may damage the remote. Please use two AAA 1.5V batteries. Do not mix battery types. Install the batteries at the correct polarities. Do not use rechargeable batteries. If your TV is to be stored for a period of time, remove the batteries from the remote control. 03 Getting Started Setting up LOCATION You will need to place your TV near your plug socket (so the power cable can comfortably reach) and within reach of your aerial socket or extension lead. CONNECTION 1. Insert your TV aerial lead into the Antenna input at the side of the TV. 2. Insert the batteries into the remote control. Make sure they are inserted the right way around, matching the polarity as indicated inside the battery compartment. SWITCHING YOUR TV ON 1.Press the STANDBY button on the right side of the TV once. Ared flashing light will appear in the corner of the screen. 2.Press STANDBY on the remote control. The TV will turn on and the red light will turn blue. This may take a few moments. 3.Select your chosen language when prompted from the list that will appear on screen. Use the button to scroll to the language you want and press to confirm. TUNING YOUR TV SWITCHING TO AN EXTERNAL SOURCE OTHER THAT TV If you have attached a DVD player or similar external device to the TV, you will need to tell the TV to display the content from it. Simply press SOURCE which will bring up the source menu in the left corner of the screen, Use the and button to highlight the required source and press OK select. For details of how to plug in other equipment see GET TO KNOW YOUR TV on page 6. Input Source TV AV SCART1 SCART2 S-Video Component1 Component2 PC HDMI1 HDMI2 HDMI3 USB AUTO SEARCH Input Source TV AV SCART1 SCART2 S-Video DVD Component PC HDMI1 HDMI2 HDMI3 USB 1. Press MENU button. 2. Press button to select Tuning menu, press button to enter. 3. Press button to select Country item. Press button to select you needed. 4. Press button to select Auto Search item, press OK button to enter. Press button to select the OK option, and press OK button to start searching. Press the MENU button ,you can choose to skip the TV /DTV Search or not. 5. Press EXIT button to stop auto search during searching. Note: It may take a few moments to complete the Auto Search. DIGITAL MANUAL SEARCH 1. Press MENU button. 2. Press button to select Tuning menu, press button to enter. 3. Press button to select Digital Manual Search item, press button to enter. 4. Press button to select the Channel. Press OK button to start searching. 5. Once a channel is located, you can press OK button to save it. Press EXIT button to exit. Menu Menu Menu OK OK OK OK OK OK OK OK OK OK OOKK OOKK OOKK COOAKKNCEL OK OK OK OK OK OK OK OK OK UHF CH 26 EXIT OK MENU TUNING YOUR TV Analog Manual Search Follow the below steps when you need to have a manual search. Menu 1. Press MENU button. OK 2. Press button to select Tuning menu, press button to enter. OK OK 3. Press button to select Analog Manual Search item, OK OK OK Press button to enter. OK 4. Press button to select Search item, press button is used to select the higher frequency channel. Press button is used to select the lower frequency channel. 5. And then select Storage To, press button to select the position number you want the channel on. Once a channel is located, you can press red button to save it. Press EXIT button to exit. Sound System Press button to select "Sound System", then press button to select the correct sound system. Current CH Press button to select the channel number to edit. Storage To Press button to select the program number you want to storage to. Fine tune If the picture and/or sound are poor, try using the FINE TUNE feature. Do not use this feature unless reception is poor. 1 Repeat above steps 1-3, then press button to select the Fine Tune item. 2 Press button repeatedly to carry out fine tune, till the best picture and sound are obtained, then loosen the button. EXIT SAVE
-
 1
1 -
 2
2 -
 3
3 -
 4
4 -
 5
5 -
 6
6 -
 7
7 -
 8
8 -
 9
9 -
 10
10 -
11
-
12
-
13
-
14
-
15
-
16
-
17
-
18
-
19
-
20
-
21
-
22
-
23
-
24
-
25
-
26
-
27
-
28
-
29
-
30
-
31
-
32
-
33
-
34
-
35
-
36
-
37
-
38
-
39
-
40
-
41
-
42
-
43
-
44
-
45
-
46
-
47
-
48
-
49
-
50
-
51
-
52
-
53
-
54
-
55
-
56
-
57
-
58
-
59
-
60
 |
 |
