Harman Kardon AVR 445 Owners Manual
Harman Kardon AVR 445 Manual
 |
View all Harman Kardon AVR 445 manuals
Add to My Manuals
Save this manual to your list of manuals |
Harman Kardon AVR 445 manual content summary:
- Harman Kardon AVR 445 | Owners Manual - Page 1
® Designed to Entertain.™ AVR 445 AUDIO/VIDEO RECEIVER OWNER'S MANUAL AVR 445 - Harman Kardon AVR 445 | Owners Manual - Page 2
AVR 445 AUDIO/VIDEO RECEIVER 3 Introduction 4 Important Safety Information 4 Unpacking 5 Front-Panel Controls 8 Rear-Panel Connections 11 Main Remote Control Functions 15 ZR 10 Remote Control Functions 17 Installation and Connections 20 System Configuration 20 Speaker Placement 22 In/ - Harman Kardon AVR 445 | Owners Manual - Page 3
pair of remote speakers while controlling volume and enabling full control over the program source and connected IR-controlled devices. Along with the latest advances in digital audio and video technology, Harman Kardon recognizes that some things remain constant, and in the case of the AVR 445 that - Harman Kardon AVR 445 | Owners Manual - Page 4
service center with a cord meeting factory specifications and any mounting hardware can support the weight of the product. AVR 445 and the heat generated by the amplifiers, there is the remote for the User This equipment has been tested and interference received, remote control. 4 SAFETY INFORMATION - Harman Kardon AVR 445 | Owners Manual - Page 5
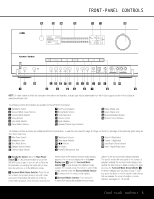
instructions that refer to this illustration, a larger copy may be downloaded from the Product Support section for this product at www.harmankardon.com. The following controls and indicators are available on the AVR 445 . The specific modes will vary based on the number of speakers available, the - Harman Kardon AVR 445 | Owners Manual - Page 6
use. Depending on the specific combination of input sources and surround mode selected, more than one indicator may light. (See page 36 for more information.) ^ Remote Sensor Window: The sensor behind this window receives infrared signals from the remote control. Aim the remote control at this area - Harman Kardon AVR 445 | Owners Manual - Page 7
boost or cut setting. See page 35 for more information on the tone controls. D Speaker Selector Button: Press this button to begin the process of manually configuring the AVR 445 for the type of speakers more information on digital audio. G Delay Adjust the EzSet/EQ automated setup process, plug the - Harman Kardon AVR 445 | Owners Manual - Page 8
follow the instructions that refer to this illustration, a larger copy may be downloaded from the Product Support section for this product at www.harmankardon.com. 0 Preamp Outputs 1 Subwoofer Output 2 Tape Outputs 3 A-BUS Connector 4 Tape Inputs 5 Surround Speaker Outputs 6 CD Audio Input 7 Front - Harman Kardon AVR 445 | Owners Manual - Page 9
. C IR Output: This connection permits the IR sensor in the receiver to serve remote controlled devices with "stripped carrier." Connect this jack to the "IR IN" jack on compatible Harman Kardon equipment. D Center Channel Speaker Outputs: Connect these outputs to the matching + and - terminals on - Harman Kardon AVR 445 | Owners Manual - Page 10
the AVR 445. This connection is also used to connect a compatible computer to the AVR for system upgrades, when available. See page 37 for more information on playback of computer audio with the AVR. Instructions for upgrades will accompany the upgrade file download package. X Optical Digital Audio - Harman Kardon AVR 445 | Owners Manual - Page 11
future use. Do not remove the plug provided or connect any device to the jack. • To make it easier to follow the instructions that refer to this illustration, a larger copy may be downloaded from the Product Support section for this product at www.harmankardon.com. MAIN REMOTE CONTROL FUNCTIONS 11 - Harman Kardon AVR 445 | Owners Manual - Page 12
445's remote is shipped from the factory to operate the AVR 445 and most Harman Kardon brand products. The remote is also capable of operating a wide variety of other products using the control codes that are part of the remote. Before using the remote with other products, follow the instructions - Harman Kardon AVR 445 | Owners Manual - Page 13
being controlled. In the factory default setting, these buttons are preprogrammed with the remote codes for Harman Kardon DVD players so that you may control a compatible player without having to switch devices. J Main Transport Controls: These buttons have no direct function on the AVR 445, but - Harman Kardon AVR 445 | Owners Manual - Page 14
to exit the settings and return to normal operation. (See page 28 for more information on manual speaker setup.) b Memory Button: Press this button to enter a radio station in the AVR 445's preset memory. First, tune the desired station, and then press this button. Within 5 seconds of when you see - Harman Kardon AVR 445 | Owners Manual - Page 15
the Multiroom system.) • To make it easier to follow the instructions that refer to the controls and connectors in this illustration, a larger copy may be downloaded from the Product Support section for this product at www.harmankardon.com. † ß ® œ ˙ π ø ñ µ ¬ ZR 10 REMOTE CONTROL FUNCTIONS 15 - Harman Kardon AVR 445 | Owners Manual - Page 16
©, the Set Button œ and the Transport Controls π may be used to navigate the iPod and to operate many functions. See page 39, and the manuals for The Bridge and your iPod for more information. ß Mute Button: When the ZR 10 remote is used in the room where the AVR 445 is located, press this button to - Harman Kardon AVR 445 | Owners Manual - Page 17
if the speakers are a different distance from the AVR 445. 8. Connections to a subwoofer are normally made via a line-level audio connection from the Subwoofer Output 1 to the line-level input of a subwoofer with a built-in amplifier. When a passive subwoofer is used, the connection first goes to - Harman Kardon AVR 445 | Owners Manual - Page 18
view other (non-HDMI) video sources. The AVR 445 does not convert analog video signals to HDMI. System and Power Connections The AVR 445 is designed for flexible use with multiroom systems, external control components and power amplifiers. Main Room Remote Control Extension If the receiver is placed - Harman Kardon AVR 445 | Owners Manual - Page 19
proper operation, specific software commands and pin wiring schemes may be required. USB Connections The AVR 445 is one of the few A/V receivers to offer a USB connection that may be used for both playback of compatible audio content from a computer and for loading of system updates (when available - Harman Kardon AVR 445 | Owners Manual - Page 20
message will result. We recommend that you consider adding a second surround back speaker for a full 7.1 system, as soon as possible. Surround Speakers for 7.1 Systems For the ultimate home theater experience, a 7.1 surround system uses both traditional surround left/right channels and a surround - Harman Kardon AVR 445 | Owners Manual - Page 21
information on subwoofer placement, as well as a variety of topics relating to audio and home theater, visit the Technology section of our Web site at www.harmankardon.com. Links are provided there to informative white papers written by the acoustic and electronics experts at Harman Kardon and at - Harman Kardon AVR 445 | Owners Manual - Page 22
are properly configured to reflect the use of digital or analog inputs, the type of video display and speakers installed, and the surround mode specifics of your home theater system. In/Out Setup The first step is to configure each input source. When an input is selected, the settings will "attach - Harman Kardon AVR 445 | Owners Manual - Page 23
menu (Figure 3) allows you to further configure the AVR 445 for special custom features. * IN/OUT SETUP * ➔ VIDEO 4 :IN OUT REC OUT :ANALOG MASTER MENU PAGE 1 Figure 3 An exclusive Harman Kardon feature is the ability to switch the front-panel analog audio/video jacks from their normal use as - Harman Kardon AVR 445 | Owners Manual - Page 24
the cursor pointing to the AUDIO SETUP line, and press the Set Button pœ. The AUDIO SETUP menu (Figure 4) will appear. * AUDIO SETUP * →TONE : BASS : TREBLE: IN OUT 0 0 BACK TO MASTER MENU Figure 4 The first line controls whether or not the bass/treble tone controls are in the signal path - Harman Kardon AVR 445 | Owners Manual - Page 25
, as they are converted to PCM within the AVR 445. The modes available include the proprietary Dolby modes (including Dolby Headphone and Dolby Virtual Speaker), DTS processing, our own Logic 7 modes, the conventional "DSP" modes (such as "Hall" and "Theater") and the "Stereo" modes. • The PCM 96kHz - Harman Kardon AVR 445 | Owners Manual - Page 26
AVR 445 uses Harman Kardon's EzSet/EQ technology to automatically configure your system to deliver the best possible performance based on your specific speaker selection, where the speakers are placed in the room and the acoustic influences in your listening room. By using a series of test signals - Harman Kardon AVR 445 | Owners Manual - Page 27
MAIN Figure 10 Step 5. At this point, a series of test tones will circulate among all the speakers in your system. While this is happening, the AVR 445 is reading the signal to determine which speaker positions are active, what type of speaker is present at each active position, what the distance is - Harman Kardon AVR 445 | Owners Manual - Page 28
the finest in home theater and music reproduction. Go to page 34 for complete information on operating your AVR 445. Manual Setup In most cases it is simpler, easier and more accurate to let EzSet/EQ take care of entering the system parameters for speaker "size", speaker crossover, channel output - Harman Kardon AVR 445 | Owners Manual - Page 29
combinations of settings sound in their home theater environment or to use settings other than those calculated by EzSet/EQ, to accommodate personal listening preferences. The menu system used in your AVR 445 differs somewhat from conventional speaker setup menus in that it consolidates the - Harman Kardon AVR 445 | Owners Manual - Page 30
listening room or home theater. In most cases, the settings established by EzSet/EQ are accurate to under a foot, but the placement of the microphone and other factors may influence the setting. Should you wish to manually adjust the channel delay times, follow the instructions shown below. Whenever - Harman Kardon AVR 445 | Owners Manual - Page 31
time for all speaker positions has been set, you may return to manual setup by pressing the ⁄/¤ Navigation Button n© until the cursor is pointing to BACK TO MANUAL SETUP; then press the Set Button pœ. The delay settings may also be adjusted at any time using the main remote control and while viewing - Harman Kardon AVR 445 | Owners Manual - Page 32
, turn the AVR 445 back on and return to this menu to resume the channel adjustment procedure. If any speaker connections were changed we also recommend that you rerun EzSet/EQ before making any manual calibration adjustments. After checking for speaker placement, let the test noise circulate again - Harman Kardon AVR 445 | Owners Manual - Page 33
listening taste, simply follow the instructions for changing the settings for that parameter as shown in this section. Having completed the setup and configuration process for your AVR 445, you are about to experience the finest in music and home theater listening. Enjoy! SYSTEM CONFIGURATION 33 - Harman Kardon AVR 445 | Owners Manual - Page 34
Operation Once you have completed the initial setup and configuration, the AVR 445 is simple to operate and enjoy. The following instructions will help you maximize the enjoyment of your new receiver: Turning the AVR 445 On or Off • When using the AVR for the first time, you must press the Main - Harman Kardon AVR 445 | Owners Manual - Page 35
Theater modes often deliver enveloping surround presentations through the use of the natural information present in all stereo recordings. Surround modes may be changed at any time by using either the front panel or remote control. To select a new surround mode from the front panel, first AVR 445 - Harman Kardon AVR 445 | Owners Manual - Page 36
compatibility with DVDs, the AVR 445 receiver will always default first to the playback mode embedded in a disc's digital "flag" information. For Dolby Digital discs, the following playback modes are initially selected after the AVR locks on to the incoming digital audio data stream: • When a Dolby - Harman Kardon AVR 445 | Owners Manual - Page 37
or "original" so that the digital audio output is returned to the multichannel data stream. For information about the specific setting on your source player, consult the manufacturer. This is not a problem with the AVR 445, but rather it is a by-product of HDMI and its associated content protection - Harman Kardon AVR 445 | Owners Manual - Page 38
the input using the ZR 10 remote, press the USB Input Selector ∂. When the USB input is selected and the AVR 445 is connected to a compatible computer with one of the media players mentioned above open, you may then use either remote's transport controls to start and stop playback, as well as move - Harman Kardon AVR 445 | Owners Manual - Page 39
to the Digital Audio Outputs X Y. Using TheBridgeTM The AVR 445 is equipped for use with Harman Kardon's optional TheBridgeTM iPod docking station. When The Bridge is connected to the AVR and an iPod properly docked, you may use either remote to control the iPod for audio playback while using - Harman Kardon AVR 445 | Owners Manual - Page 40
service to add special data and information tags into the digital audio data stream, means that some of the front-panel and remote controls the Direct button first. • The AVR 445 has five banks indicating that the XM tuner is downloading content and may not be able the AVR 445 offers Harman Kardon's - Harman Kardon AVR 445 | Owners Manual - Page 41
adjustment for the AVR 445 is established using EzSet/EQ, as outlined on pages 26-28. In some cases, however, it may be desirable to trim the output levels using program material such as a test disc, or a selection you are familiar with. Additionally, the output level for the subwoofer can only be - Harman Kardon AVR 445 | Owners Manual - Page 42
-On Volume Level As is the case with most audio/video receivers, when the AVR 445 is turned on, it will always return to the volume setting in effect when the unit was turned off. However, you may prefer to always have the AVR 445 turn on at a specific setting, regardless of what was last in use - Harman Kardon AVR 445 | Owners Manual - Page 43
Auto Power When using Harman Kardon's optional TheBridgeTM iPod docking station, the normal operation is to have the iPod selected as the input source only when it is specifically chosen. However, you may set the AVR so that whenever the iPod is turned on, the AVR will also turn on automatically - Harman Kardon AVR 445 | Owners Manual - Page 44
for remote control, visit the Harman Kardon Web site at www.harmankardon.com or contact our customer service department. Multiroom Setup Once the audio and IR link connections have been made, the AVR 445 needs to be configured for multiroom operation. To change a setting from its factory default - Harman Kardon AVR 445 | Owners Manual - Page 45
IR sensor or A-BUS module has been installed and properly connected back to the AVR, you may use either the main remote control, the ZR 10 or any remote programmed with standard Harman Kardon remote control codes. Unlike many other products, the AVR 445 does not use different codes for main room and - Harman Kardon AVR 445 | Owners Manual - Page 46
may be programmed into the AVR 445 remote using its extensive library of remote codes or a head-to-head learning process for codes not in the internal library. As an alternative to the AVR remote, consider purchasing Harman Kardon's TC 30 activity-based remote, which uses Web setup wizards to custom - Harman Kardon AVR 445 | Owners Manual - Page 47
code. By programming the display's input selection remote code for the specific device, you can, for example, press the VID 3/Cable Input Selector Button d and not only have the AVR switch to a cable set-top for audio selection and have the AVR remote use remote codes for the cable box, but you can - Harman Kardon AVR 445 | Owners Manual - Page 48
AVR remote, press and hold the button on the remote control for the device to be programmed within 5 seconds, as instructed on the next menu screen (Figure 39). PRESS KEY ON ORIGINAL REMOTE Codes for an Input Selector The AVR 445's remote allows you to learn a specific code to be attached to one of - Harman Kardon AVR 445 | Owners Manual - Page 49
remote to control the device you have selected. However, in some circumstances you may have configured your system so that the devices connected to the AVR 445 specific brand to be used, and for that reason they are identical to the way a device is programmed using manual in the instructions that will - Harman Kardon AVR 445 | Owners Manual - Page 50
button is pressed, press the AVR button. In your specific macro, this is the first command button. SELECT A DEVICE AVR Figure 52 7. The next the instructions on the remote's LCD screen, press the first key you wish to be transmitted in the macro. In our example, we first want the AVR 445 to - Harman Kardon AVR 445 | Owners Manual - Page 51
As soon as the Set button is pressed, the first two steps in the macro will be appear in the remote's LCD screen. You may then use the ⁄/¤ or satellite receiver is connected through the AVR 445, you will most likely want to use the AVR 445's volume control commands even when the remote has been - Harman Kardon AVR 445 | Owners Manual - Page 52
remote to default settings will appear as shown in Figure 69. PUNCH-THROUGH VCR - Harman Kardon AVR 445 | Owners Manual - Page 53
audio/video products, system operation may be easier if the displays shown in the remote's LCD screen are customized to reflect the specific characteristics of a playback source's brand name or the new function given to a specific button when one remote's controls are programmed into the AVR remote - Harman Kardon AVR 445 | Owners Manual - Page 54
first button within the device to be renamed, as instructed in the display shown in Figure 80. Select the button by simply pressing it on the remote remote. See page 45 for more information. • When a key is renamed it will only apply to the specific and reset the remote to the original factory default - Harman Kardon AVR 445 | Owners Manual - Page 55
to indicate that the setting has been accepted by the remote's memory. Backlight Options The AVR 445's remote has a built-in backlight system that makes it easier to use the remote when the room lighting is dimmed for an optimal home theater experience. To turn the backlighting on, simply press the - Harman Kardon AVR 445 | Owners Manual - Page 56
in normal operation, you may find that they need to be changed sooner after the remote is programmed for the first time. • When the batteries approach a level below which the remote will not function, the remote's LCD screen will display a LOW BATTERY warning, as shown in Figure 91. We strongly - Harman Kardon AVR 445 | Owners Manual - Page 57
system reset may clear the problem. To clear the AVR 445's entire system memory including tuner presets, output level settings, delay times and speaker configuration data, first put the steps do not solve the problem, consult an authorized Harman Kardon service center. TROUBLESHOOTING GUIDE 57 - Harman Kardon AVR 445 | Owners Manual - Page 58
configured for surround back speakers. Movie, Music and Game versions are available that customize the processing to the type of source in use. These modes may also be used to create 7.1 sound fields from 5.1 digital soundtracks. Exclusive to Harman Kardon for A/V receivers, Logic 7 is an advanced - Harman Kardon AVR 445 | Owners Manual - Page 59
that they may be restored in the event the AVR's memory is lost due to an extended power outage, system upgrade, processor reset, or other major service to your unit. Additional copies of this worksheet may be downloaded from the Harman Kardon Web site at www.harmankardon.com. Worksheet A: Surround - Harman Kardon AVR 445 | Owners Manual - Page 60
Right Surround Right Surround Back Right Surround Back Left Surround Left Subwoofer System Default 12.0 Feet 12.0 Feet 12.0 Feet 10.0 and Settings Feature Front L/R Speaker Size & X-Over Center Speaker Size & X-Over Surround L/R Speaker Size & X-Over Surround Back Speaker Size & X-Over LFE LP - Harman Kardon AVR 445 | Owners Manual - Page 61
Input Title Surround Mode Audio In Port Audio Auto Poll Video In Port Component Video Input Video Processing A/V Sync Delay Record Output Auto Poll ADC Sampling Tone In/Out Bass Treble DVD Video 1 Video 2 Video 3 Video 4 HDMI 1 HDMI 2 CD Tape Tuner The Bridge USB 6/8 Ch Direct APPENDIX APPENDIX - Harman Kardon AVR 445 | Owners Manual - Page 62
, 70dB 80dB 90dB Supplied Accessories The AVR 445 is supplied with the following accessory items. If any item is missing, please contact Harman Kardon customer service at www.harmankardon.com. • Six AAA batteries • System remote control • ZR 10 remote control • microphone • Extender rod for - Harman Kardon AVR 445 | Owners Manual - Page 63
- Harman Kardon AVR 445 | Owners Manual - Page 64
250 Crossways Park Drive, Woodbury, New York 11797 www.harmankardon.com ® © 2006 Harman International Industries, Incorporated. All rights reserved. Part No. ZKD3101HA00
-
 1
1 -
 2
2 -
 3
3 -
 4
4 -
 5
5 -
 6
6 -
 7
7 -
8
-
9
-
10
-
11
-
12
-
13
-
14
-
15
-
16
-
17
-
18
-
19
-
20
-
21
-
22
-
23
-
24
-
25
-
26
-
27
-
28
-
29
-
30
-
31
-
32
-
33
-
34
-
35
-
36
-
37
-
38
-
39
-
40
-
41
-
42
-
43
-
44
-
45
-
46
-
47
-
48
-
49
-
50
-
51
-
52
-
53
-
54
-
55
-
56
-
57
-
58
-
59
-
60
-
61
-
62
-
63
-
64
 |
 |
AVR
445
AVR 445
AUDIO/VIDEO RECEIVER
OWNER’S MANUAL
Designed to Entertain
.
™
®