Harman Kardon AVR 445 Owners Manual - Page 13
the A/V Sync Delay, press - ipod
 |
View all Harman Kardon AVR 445 manuals
Add to My Manuals
Save this manual to your list of manuals |
Page 13 highlights
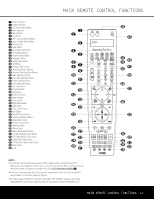
MAIN REMOTE CONTROL FUNCTIONS the volume, press the button marked ¤ by pressing toward the bottom of the remote. The ‹/› buttons on the left and right sides of this disc change channels up or down when the TV, cable box or satellite Input Selectors 3 have been pressed. s Transport Fast-Play/Scan Buttons: These buttons have no direct function on the AVR 445, but they are used when the remote is programmed for a compatible DVD, CD or tape player. Pressing these buttons will transmit a fast-play forward, fast-play reverse, or fastforward or -reverse scan command, according to the capabilities of the player being controlled. In the factory default setting, these buttons are preprogrammed with the remote codes for Harman Kardon DVD players so that you may control a compatible player without having to switch devices. J Main Transport Controls: These buttons have no direct function on the AVR 445, but they are used when the remote is programmed for a compatible DVD, CD or tape player. Pressing these buttons will transmit a stop (Í), record (Î), or pause (±) command, according to the capabilities of the player being controlled. In the factory default setting, these buttons are programmed with the remote codes for Harman Kardon DVD players so that you may control a compatible player without having to switch devices. K Track Skip Up/Down Buttons: These buttons do not have a direct function with the AVR 445, but when used with a compatibly programmed CD or DVD changer, they will change the track or chapter currently being played. In the factory default setting, these buttons are programmed with the remote codes for Harman Kardon DVD players so that you may control a compatible player without having to switch devices. L Preset Up/Down Button: When the tuner is in use, press this button to scroll through the stations programmed into the AVR 445's memory. NOTE: When the AVR 445 is used with The Bridge (optional) and your iPod, some of the buttons that are used to control the various transport functions on source devices are used to control the iPod, and navigate through its menus and content. Consult the owner's manual packed with The Bridge for more information. M Tuning Up/Down Button: Press this button when the tuner is in use to change the station to one with a higher or lower frequency, or to change the XM channel. When the tuner is in the MANUAL/ MONO mode, each tap of the selector will increase or decrease the frequency by one increment. When the tuner receives a signal sufficient for adequate reception, MANUAL TUNED will appear in the Lower Display Line $ and in the on-screen display. When the tuner is in the AUTO/STEREO mode, press the button once, and the tuner will scan for a station with acceptable signal strength. When the next higher- or lower-frequency station with a strongenough signal is tuned, the frequency scan will stop and the Lower Display Line $ and the on-screen display will indicate AUTO TUNED. When an FM Stereo station is tuned, the display will read AUTO ST TUNED. See page 39 for more information on using the tuner. N Disc Skip Button: This button has no direct function for the AVR 445 but may be used to change the disc in a CD or DVD changer when the remote is programmed for that type of device. O Program Button: This button is used to begin the process of programming the remote. Press and hold this button for 3 seconds to place the remote in the programming mode. Once the red LED under the Set Button p lights, release the button. You may then select from the desired option. (See pages 46-56 for more information on configuring the remote.) P Light Button: Press this button to activate the remote's backlight for ease of use in darkened rooms. Q Multiroom Button: Press this button to begin the process of activating the multiroom system or to change the input or volume level for the second zone. (See page 44 for additional information on the multiroom system.) R Macro Buttons: Press these buttons to store or recall a "Macro", which is a preprogrammed sequence of commands stored in the remote. (See page 49 for more information on macros.) S Sleep Button: Press this button to place the unit in the Sleep mode. After the time shown in the display, the AVR 445 will automatically go into the Standby mode. Each press of the button changes the time until turn-off in the following order: When the Sleep timer is in use, the front-panel display indicators will dim to half-brightness. T Night Mode Button: Press this button to activate the Night mode. The Night mode is available in specially encoded Dolby Digital sources, and it preserves dialogue (center channel) intelligibility at low volume levels. U OSD Button: Press this button to activate or turn off the On-Screen Display (OSD) system used to set up or adjust the AVR 445's parameters. V Tone Control Button: This button controls the tone mode settings, enabling adjustment of the bass and treble boost/cut. You may also use it to take the tone controls out of the signal path completely for "flat" response. The first press of the button displays a TONE IN message in the on-screen display and in the Lower Display Line $. To take the controls out of the signal path, press either of the ⁄/¤ Navigation Buttons n until the display reads TONE OUT. To change the bass or treble set-tings, press the button again until the desired option appears in the Lower Display Line $ and in the on-screen display and then press either of the ⁄/¤ Navigation Buttons n to enter the desired boost or cut setting. See page 35 for more information on the tone controls. W Dim Button: Press this button to activate the Dimmer function, which reduces the brightness of the front-panel display, or turns it off entirely. Press the button once to change the display to reduce the brightness by 50%, and press it again within 5 seconds and the main display will go completely dark. Note that this setting is temporary; regardless of any changes, the display will always return to full-brightness when the AVR is turned on. The blue illumination around the Standby/On Switch 1 will always remain at full-brightness, regardless of the setting, to remind you that the AVR is still turned on. The blue accent lighting inside the volume control will also remain at full-brightness when the panel is at 50%, but go out when the panel lights are fully dimmed. X Tuner/FM Select Button: This button functions in two ways. Press it up, toward the top of the remote, to select the tuner as the AVR's input. The first press will call up the last-used station (or XM channel). Subsequent presses will select the last-used FM, AM and XM Radio station or channel. When the button is pressed down, toward the bottom of the remote, the last-tuned FM station is selected as the AVR's input. Y Channel Up/Down Selector: This button has no function when the AVR is being controlled, but when programmed for use with a VCR, TV, cable box, satellite receiver or other similar product, it will change the channel up or down. See pages 46-56 for more information on programming the remote. Z Delay Select Button: This button selects adjustments to the A/V Sync Delay and the individual channel displays. The first press of the button displays an A/V SYNC DELAY message in the Lower Display Line $ and in the on-screen display, which means that you may change the amount of time that all channels are delayed together behind the video. This enables you to compensate for the loss of lip sync that may be caused by digital video processing in your display or by television stations. To change the A/V Sync Delay, press the Set Button p while the A/V SYNC DELAY message is visible, and then use the ⁄/¤ Navigation Buttons n to change the setting so that the sound and the video image are in sync. To change the delay for an individual output channel, press the ⁄/¤ Navigation Button n until the desired channel name is shown, and then press the Set Button p. MAIN REMOTE CONTROL FUNCTIONS 13
-
 1
1 -
2
-
3
-
4
-
5
-
6
-
7
-
 8
8 -
 9
9 -
 10
10 -
 11
11 -
 12
12 -
 13
13 -
 14
14 -
 15
15 -
 16
16 -
 17
17 -
 18
18 -
19
-
20
-
21
-
22
-
23
-
24
-
25
-
26
-
27
-
28
-
29
-
30
-
31
-
32
-
33
-
34
-
35
-
36
-
37
-
38
-
39
-
40
-
41
-
42
-
43
-
44
-
45
-
46
-
47
-
48
-
49
-
50
-
51
-
52
-
53
-
54
-
55
-
56
-
57
-
58
-
59
-
60
-
61
-
62
-
63
-
64
 |
 |
