Harman Kardon AVR 445 Owners Manual - Page 5
Front-panel Controls - avr 445 specification
 |
View all Harman Kardon AVR 445 manuals
Add to My Manuals
Save this manual to your list of manuals |
Page 5 highlights
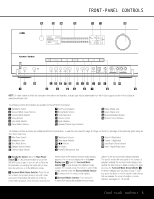
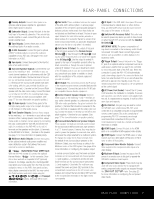
AVR 445 ^ %$ # FRONT-PANEL CONTROLS @! ) DIGITAL PRO LOGIC IIx HEADPHONE VIRTUAL SPEAKER 57CH. STEREO DIRECT DSP SURR. OFF VID 12 DMP VID 34 USB XMFMAM HDMI TAPE CDMI 6CH DVD 8CH A B CDEFG H I H J K L MN 1 2 3 45 67 8 9 NOTE: To make it easier to follow the instructions that refer to this illustration, a larger copy may be downloaded from the Product Support section for this product at www.harmankardon.com. The following controls and indicators are available on the AVR 445's front panel: 1 Standby/On Switch 2 Surround Mode Group Selector 3 Surround Mode Selector 4 Tuning Selector 5 Tuner Band Selector 6 Preset Station Selector 7 Input Source Selector 8 Tuning Mode Selector 9 Front-Panel Door ) Volume Control ! Input Indicators @ Speaker/Channel Input Indicators # Upper Display Line $ Lower Display Line % Surround Mode Indicators ^ Remote Sensor Window The following controls and jacks are located behind the front-panel door. To open the door, place the edge of a finger on the left or right edge of the panel and gently swing the door down toward you. A Main Power Switch F Digital Input Selector K Optical 4 Digital Input B Headphone Jack G Delay Adjust Selector L Coaxial 4 Digital Input C Tone Mode Button H ‹/› Buttons M Input/Output Status Indicator D Speaker Selector Button I Set Button N Video 4 Input/Output Jacks E Channel Adjust Selector J EzSet/EQ Microphone Jack 1 Standby/On Switch: When the Main Power Switch A is "ON," press this button to turn on the AVR 445; press it again to turn the unit off. Note that the illumination surrounding the switch will turn blue when the unit is on, or in the Multiroom mode. 2 Surround Mode Group Selector: Press this button to select the top-level group of surround modes. Each press of the button will select one of the surround mode categories. Once the button is pressed so that the name of the desired surround mode category appears in the on-screen display and in the Lower Display Line $, press the Surround Mode Selector 3 to cycle through the individual modes available. For example, press this button to select Dolby modes, and then press the Surround Mode Selector 3 to choose from the various mode options. 3 Surround Mode Selector: Press this button to select from among the available surround mode options for the surround mode category selected. The specific modes will vary based on the number of speakers available, the surround mode category and whether the input source is digital or analog. For example, press the Surround Mode Group Selector 2 to select a category such as Dolby or Logic 7, and then press this button to see the specific mode choices that are available. For more information on mode selection, see pages 24, 35 and 58. FRONT-PANEL CONTROLS 5
-
 1
1 -
 2
2 -
 3
3 -
 4
4 -
 5
5 -
 6
6 -
 7
7 -
 8
8 -
 9
9 -
 10
10 -
 11
11 -
12
-
13
-
14
-
15
-
16
-
17
-
18
-
19
-
20
-
21
-
22
-
23
-
24
-
25
-
26
-
27
-
28
-
29
-
30
-
31
-
32
-
33
-
34
-
35
-
36
-
37
-
38
-
39
-
40
-
41
-
42
-
43
-
44
-
45
-
46
-
47
-
48
-
49
-
50
-
51
-
52
-
53
-
54
-
55
-
56
-
57
-
58
-
59
-
60
-
61
-
62
-
63
-
64
 |
 |
