Harman Kardon AVR 445 Owners Manual - Page 26
Using EzSet/EQ
 |
View all Harman Kardon AVR 445 manuals
Add to My Manuals
Save this manual to your list of manuals |
Page 26 highlights
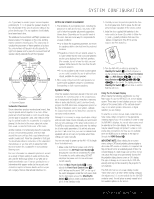
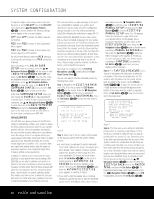
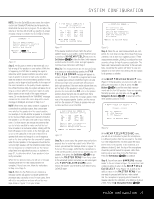
SYSTEM CONFIGURATION To adjust the Night mode setting, make certain that the cursor is on the NIGHT line of the DOLBY menu. Next, press ‹/› Navigation Buttons D© to choose between the following settings, as they appear in the on-screen display: OFF: When OFF is shown, the Night mode will not function. MID: When MID is shown, a mild compression will be applied. MAX: When MAX is shown, a more severe compression algorithm will be applied. We recommend that you select the MID setting as a starting point and change to the MAX setting later, if desired. When all settings on the DOLBY SURR SETUP menu are compete, press the ⁄/¤ Navigation Buttons D© until the cursor is next to BACK TO SURROUND SETUP and press the Set Button pœ. You may then make any additional changes to the available options from that screen, or use ⁄/¤ Navigation Buttons D© to move the cursor to the BACK TO SURROUND CONFIG menu; press the Set Button pœ again to back up one menu. At the main SURROUND SETUP menu, you may change the SOURCE to make adjustments to another input, or when all input sources have been configured, use ⁄/¤ Navigation Buttons D© to move the cursor to the BACK TO MASTER MENU and press the Set Button pœ to return to the main menu so that you may move to the next step in configuring your AVR 445. Using EzSet/EQ The AVR 445 uses Harman Kardon's EzSet/EQ technology to automatically configure your system to deliver the best possible performance based on your specific speaker selection, where the speakers are placed in the room and the acoustic influences in your listening room. By using a series of test signals and the processing power of the Texas Instruments™DA 610 digital signal processor, EzSet/EQ eliminates the need for manual adjustment of speaker "size", crossover, delay and output level settings while it adds the power of proprietary algorithms and configurable digital filters to deliver optimal sound reproduction. In addition to making system setup quick and easy, EzSet/EQ is more precise than manual settings. With EzSet/EQ you are able to calibrate your system in a fraction of the time it would take to enter the settings manually, and with results that rival those achieved with expensive test equipment and time consuming procedures. The end result is a system calibration profile that enables your new receiver to deliver the best possible sound no matter what type of speakers you have or what the properties of your listening room are. We recommend that you take advantage of the precision of EzSet/EQ to calibrate your system, but if desired you may also make any of the configuration settings manually, or trim the settings provided by EzSet/EQ by following the instructions on pages 28-33. Before starting the EzSet/EQ process, make certain that you have connected all speakers for your system and that you have both the EzSet/EQ microphone and the extender rod handy. If you have a standard camera tripod, attach the extender rod to the tripod, and then screw the microphone to the top of the rod. Place the tripod at your primary listening position, at least three feet from the nearest hard surface and adjust it so that microphone is at or above ear level. If you do not have a tripod, simply screw the extender rod into the bottom of the EzSet/EQ microphone. Next, plug the microphone into the EzSet/EQ Microphone Jack J located behind the Front Panel Control Door 9. You are now ready to start the EzSet/EQ process by following these steps: Step 1. Navigate to the EZSET/EQ MAIN menu (Fig. 8) by first pressing the OSD Button U∫ on the remote. Press the ¤ Navigation Button n© until the cursor is pointing to EZSET/EQ in the MASTER MENU. Press the Set Button pœ to bring the new menu to the screen. * EZSET/EQ MAIN * Select activity: → AUTOMATIC EQ DESIGN MANUAL EQ DESIGN EZSET/EQ MANUAL SETUP BACK TO MASTER MENU Figure 8 Step 2. Select one of the two options shown based on the way you wish to have the system settings entered: • In most cases, you will want to use the Automatic mode, which calibrates the system for speaker presence, speaker "size", speaker crossover, channel output level, speaker-to-listener delay time and room equalization. To choose this mode simply press the Set Button pœ, as the cursor is already pointing to AUTOMATIC EQ DESIGN when the menu appears on the screen. Then press the Set Button pœ again when the AUTOMATIC EZSET/EQ menu appears, to continue to Step 3. • If you wish to enter the speaker size or crossover frequencies yourself, but want to have the EzSet/EQ system test for and calibrate all the other functions listed above, press the ¤ Navigation Button n© to point the cursor to EZSET/EQ MANUAL SETUP and then press the Set Button pœ. Once the EZSET/EQ MANUAL SETUP menu (Fig. 18) appears, follow the instructions on page 29 to enter your desired settings for the speaker size or Crossover Frequencies, and then return to the EZSET/EQ MAIN menu. Press the ¤ Navigation Button n© again so that the cursor is pointing to MANUAL EQ DESIGN and then press the Set Button pœ. When the interim message screen appears to remind you to set the crossovers, make sure that the cursor is pointing to CONTINUE and press the Set Button pœ again since you have already set the crossovers. Step 3. The FAR FIELD MEASURE screen (Figure 9) will appear with instructions to place the microphone, if you have not already done so. This screen is also the place to set the master volume level. As noted on the screen, use the Volume Control )r˙ to adjust the volume level to -35dB, as shown on the line that appears at the bottom of the menu when the volume is adjusted. Press the Set Button pœ when the volume is set to the proper level. * FAR FIELD MEASURE * Place mic at ear level near the listening position at least 3ft/ 1m from any hard surface. Set volume to -35dB → CONTINUE BACK TO EZSET/EQ MAIN BACK TO MASTER MENU VOLUME: -35dB Figure 9 Step 4. The final menu screen before the EzSet/EQ process starts is a warning screen (Figure 10) that serves as a reminder to keep the room as quiet as possible while the system is in use. Extraneous noise of any kind may adversely affect the accuracy of the system's results. Do not talk while the test tones are circulating, and if possible, turn off any ventilation systems if the noise form the air flow is loud enough for you to hear. Should an outside noise such as a phone ringing occur during the test process, we recommend that you rerun EzSet/EQ. If you do not wish to start the test process at this time, press the ⁄/¤ Navigation Button n© to return to either the EZSET/EQ MAIN menu or the MASTER MENU, and press the Set Button pœ. To begin the EzSet/EQ Near Field measurements, press the ‹/› Navigation Button n© so that ON is highlighted, and press the Set Button pœ. 26 SYSTEM CONFIGURATION
-
 1
1 -
2
-
3
-
4
-
5
-
6
-
7
-
8
-
9
-
10
-
11
-
12
-
13
-
14
-
15
-
16
-
17
-
18
-
19
-
20
-
 21
21 -
 22
22 -
 23
23 -
 24
24 -
 25
25 -
 26
26 -
 27
27 -
 28
28 -
 29
29 -
 30
30 -
 31
31 -
32
-
33
-
34
-
35
-
36
-
37
-
38
-
39
-
40
-
41
-
42
-
43
-
44
-
45
-
46
-
47
-
48
-
49
-
50
-
51
-
52
-
53
-
54
-
55
-
56
-
57
-
58
-
59
-
60
-
61
-
62
-
63
-
64
 |
 |
