HP 100B Maintenance & Service Guide HP 100B All-in-One - Page 62
To install a webcam module, reverse the removal procedures.
 |
View all HP 100B manuals
Add to My Manuals
Save this manual to your list of manuals |
Page 62 highlights
6. To remove the webcam module from the bracket, remove the two Phillips PM20x30 screws that secure the module to the bracket, and then remove the module from the bracket. Figure 6-35 Removing the webcam module from the bracket To install a webcam module, reverse the removal procedures. 54 Chapter 6 Removal and Replacement Procedures All-in One (AIO) Chassis
-
 1
1 -
2
-
3
-
4
-
5
-
6
-
7
-
8
-
9
-
10
-
11
-
12
-
13
-
14
-
15
-
16
-
17
-
18
-
19
-
20
-
21
-
22
-
23
-
24
-
25
-
26
-
27
-
28
-
29
-
30
-
31
-
32
-
33
-
34
-
35
-
36
-
37
-
38
-
39
-
40
-
41
-
42
-
43
-
44
-
45
-
46
-
47
-
48
-
49
-
50
-
51
-
52
-
53
-
54
-
55
-
56
-
 57
57 -
 58
58 -
 59
59 -
 60
60 -
 61
61 -
 62
62 -
 63
63 -
 64
64 -
 65
65 -
 66
66 -
 67
67 -
68
-
69
-
70
-
71
-
72
-
73
-
74
-
75
-
76
-
77
-
78
-
79
-
80
-
81
-
82
-
83
-
84
-
85
-
86
-
87
-
88
-
89
-
90
-
91
-
92
-
93
-
94
-
95
-
96
-
97
-
98
-
99
-
100
-
101
-
102
-
103
-
104
 |
 |

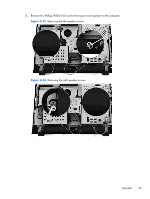
6.
To remove the webcam module from the bracket, remove the two Phillips PM20x30 screws that
secure the module to the bracket, and then remove the module from the bracket.
Figure 6-35
Removing the webcam module from the bracket
To install a webcam module, reverse the removal procedures.
54
Chapter 6
Removal and Replacement Procedures All-in One (AIO) Chassis