HP 100B Maintenance & Service Guide HP 100B All-in-One - Page 69
Preparing to Disassemble the Computer, on Rear Cover, Optical Drive, Optical Drive Bracket
 |
View all HP 100B manuals
Add to My Manuals
Save this manual to your list of manuals |
Page 69 highlights
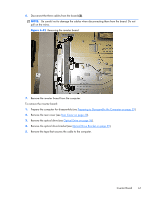
6. Disconnect the three cables from the board (2). NOTE: Be careful not to damage the cables when disconnecting them from the board. Do not pull on the wires. Figure 6-42 Removing the inverter board 7. Remove the inverter board from the computer. To remove the inverter board: 1. Prepare the computer for disassembly (see Preparing to Disassemble the Computer on page 29). 2. Remove the rear cover (see Rear Cover on page 30). 3. Remove the optical drive (see Optical Drive on page 36). 4. Remove the optical drive bracket (see Optical Drive Bracket on page 59). 5. Remove the tape that secures the cable to the computer. Inverter Board 61
-
 1
1 -
2
-
3
-
4
-
5
-
6
-
7
-
8
-
9
-
10
-
11
-
12
-
13
-
14
-
15
-
16
-
17
-
18
-
19
-
20
-
21
-
22
-
23
-
24
-
25
-
26
-
27
-
28
-
29
-
30
-
31
-
32
-
33
-
34
-
35
-
36
-
37
-
38
-
39
-
40
-
41
-
42
-
43
-
44
-
45
-
46
-
47
-
48
-
49
-
50
-
51
-
52
-
53
-
54
-
55
-
56
-
57
-
58
-
59
-
60
-
61
-
62
-
63
-
 64
64 -
 65
65 -
 66
66 -
 67
67 -
 68
68 -
 69
69 -
 70
70 -
 71
71 -
 72
72 -
 73
73 -
 74
74 -
75
-
76
-
77
-
78
-
79
-
80
-
81
-
82
-
83
-
84
-
85
-
86
-
87
-
88
-
89
-
90
-
91
-
92
-
93
-
94
-
95
-
96
-
97
-
98
-
99
-
100
-
101
-
102
-
103
-
104
 |
 |

6.
Disconnect the three cables from the board
(2)
.
NOTE:
Be careful not to damage the cables when disconnecting them from the board. Do not
pull on the wires.
Figure 6-42
Removing the inverter board
7.
Remove the inverter board from the computer.
To remove the inverter board:
1.
Prepare the computer for disassembly (see
Preparing to Disassemble the Computer
on page
29
).
2.
Remove the rear cover (see
Rear Cover
on page
30
).
3.
Remove the optical drive (see
Optical Drive
on page
36
).
4.
Remove the optical drive bracket (see
Optical Drive Bracket
on page
59
).
5.
Remove the tape that secures the cable to the computer.
Inverter Board
61