HP 100B Maintenance & Service Guide HP 100B All-in-One - Page 78
System Board Shield,
 |
View all HP 100B manuals
Add to My Manuals
Save this manual to your list of manuals |
Page 78 highlights
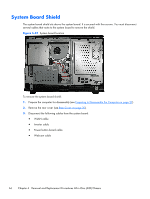
3. Remove the system board shield (see System Board Shield on page 66). 4. Disconnect the antenna cable from the module (1), and then remove the screw (2) that secures the module to the computer. Figure 6-51 Disconnecting the WLAN module 5. Lift the module to a 45-degree angle (3), and then remove it from the system board (4). Figure 6-52 Removing the WLAN module 70 Chapter 6 Removal and Replacement Procedures All-in One (AIO) Chassis
-
 1
1 -
2
-
3
-
4
-
5
-
6
-
7
-
8
-
9
-
10
-
11
-
12
-
13
-
14
-
15
-
16
-
17
-
18
-
19
-
20
-
21
-
22
-
23
-
24
-
25
-
26
-
27
-
28
-
29
-
30
-
31
-
32
-
33
-
34
-
35
-
36
-
37
-
38
-
39
-
40
-
41
-
42
-
43
-
44
-
45
-
46
-
47
-
48
-
49
-
50
-
51
-
52
-
53
-
54
-
55
-
56
-
57
-
58
-
59
-
60
-
61
-
62
-
63
-
64
-
65
-
66
-
67
-
68
-
69
-
70
-
71
-
72
-
 73
73 -
 74
74 -
 75
75 -
 76
76 -
 77
77 -
 78
78 -
 79
79 -
 80
80 -
 81
81 -
 82
82 -
 83
83 -
84
-
85
-
86
-
87
-
88
-
89
-
90
-
91
-
92
-
93
-
94
-
95
-
96
-
97
-
98
-
99
-
100
-
101
-
102
-
103
-
104
 |
 |

3.
Remove the system board shield (see
System Board Shield
on page
66
).
4.
Disconnect the antenna cable from the module
(1)
, and then remove the screw
(2)
that secures the
module to the computer.
Figure 6-51
Disconnecting the WLAN module
5.
Lift the module to a 45-degree angle
(3)
, and then remove it from the system board
(4)
.
Figure 6-52
Removing the WLAN module
70
Chapter 6
Removal and Replacement Procedures All-in One (AIO) Chassis