HP 100B Maintenance & Service Guide HP 100B All-in-One - Page 74
System Board Shield
 |
View all HP 100B manuals
Add to My Manuals
Save this manual to your list of manuals |
Page 74 highlights
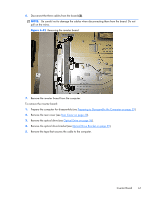
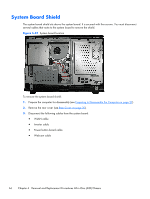
System Board Shield The system board shield sits above the system board. It is secured with five screws. You must disconnect several cables that route to the system board to remove the shield. Figure 6-47 System board location To remove the system board shield: 1. Prepare the computer for disassembly (see Preparing to Disassemble the Computer on page 29). 2. Remove the rear cover (see Rear Cover on page 30). 3. Disconnect the following cables from the system board: ● WLAN cable ● Inverter cable ● Power button board cable ● Webcam cable 66 Chapter 6 Removal and Replacement Procedures All-in One (AIO) Chassis
-
 1
1 -
2
-
3
-
4
-
5
-
6
-
7
-
8
-
9
-
10
-
11
-
12
-
13
-
14
-
15
-
16
-
17
-
18
-
19
-
20
-
21
-
22
-
23
-
24
-
25
-
26
-
27
-
28
-
29
-
30
-
31
-
32
-
33
-
34
-
35
-
36
-
37
-
38
-
39
-
40
-
41
-
42
-
43
-
44
-
45
-
46
-
47
-
48
-
49
-
50
-
51
-
52
-
53
-
54
-
55
-
56
-
57
-
58
-
59
-
60
-
61
-
62
-
63
-
64
-
65
-
66
-
67
-
68
-
 69
69 -
 70
70 -
 71
71 -
 72
72 -
 73
73 -
 74
74 -
 75
75 -
 76
76 -
 77
77 -
 78
78 -
 79
79 -
80
-
81
-
82
-
83
-
84
-
85
-
86
-
87
-
88
-
89
-
90
-
91
-
92
-
93
-
94
-
95
-
96
-
97
-
98
-
99
-
100
-
101
-
102
-
103
-
104
 |
 |

System Board Shield
The system board shield sits above the system board. It is secured with five screws. You must disconnect
several cables that route to the system board to remove the shield.
Figure 6-47
System board location
To remove the system board shield:
1.
Prepare the computer for disassembly (see
Preparing to Disassemble the Computer
on page
29
).
2.
Remove the rear cover (see
Rear Cover
on page
30
).
3.
Disconnect the following cables from the system board:
●
WLAN cable
●
Inverter cable
●
Power button board cable
●
Webcam cable
66
Chapter 6
Removal and Replacement Procedures All-in One (AIO) Chassis