HP 2140 HP MINI User Guide - Windows Vista - Page 77
Using an optional external optical drive (select models only), Inserting an optical disc (CD or DVD)
 |
UPC - 884420854753
View all HP 2140 manuals
Add to My Manuals
Save this manual to your list of manuals |
Page 77 highlights
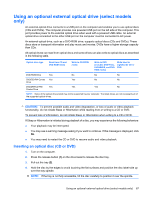
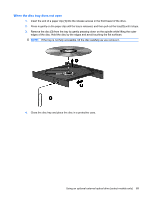
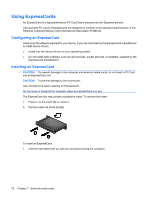
Using an optional external optical drive (select models only) An external optical drive connects to a USB port on the computer and enables you to use optical discs (CDs and DVDs). The computer provides one powered USB port on the left side of the computer. This port provides power to the external optical drive when used with a powered USB cable. An external optical drive connected to the other USB port on the computer must be connected to AC power. An external optical drive, such as a DVD-ROM drive, supports optical discs (CDs and DVDs). These discs store or transport information and play music and movies. DVDs have a higher storage capacity than CDs. All optical drives can read from optical discs and some drives can also write to optical discs as described in the following table. Optical drive type Read from CD and DVD-ROM media Write to CD-R/RW media Write to DVD (includes DVD+R DL, DVD±RW/R, and DVDRAM media) Write label to LightScribe CD or DVD DVD-ROM Drive Yes No No No DVD/CD-RW Combo Yes Yes No No Drive DVD±RW/CD-RW Yes Yes Yes No Combo Drive NOTE: Some of the optical drives listed may not be supported by your computer. The listed drives are not necessarily all of the supported optical drives. CAUTION: To prevent possible audio and video degradation, or loss of audio or video playback functionality, do not initiate Sleep or Hibernation while reading from or writing to a CD or DVD. To prevent loss of information, do not initiate Sleep or Hibernation when writing to a CD or DVD. If Sleep or Hibernation is initiated during playback of a disc, you may experience the following behaviors: ● Your playback may be interrupted. ● You may see a warning message asking if you want to continue. If this message is displayed, click No. ● You may need to restart the CD or DVD to resume audio and video playback. Inserting an optical disc (CD or DVD) 1. Turn on the computer. 2. Press the release button (1) on the drive bezel to release the disc tray. 3. Pull out the tray (2). 4. Hold the disc by the edges to avoid touching the flat surfaces and position the disc label-side up over the tray spindle. NOTE: If the tray is not fully accessible, tilt the disc carefully to position it over the spindle. Using an optional external optical drive (select models only) 67
-
 1
1 -
2
-
3
-
4
-
5
-
6
-
7
-
8
-
9
-
10
-
11
-
12
-
13
-
14
-
15
-
16
-
17
-
18
-
19
-
20
-
21
-
22
-
23
-
24
-
25
-
26
-
27
-
28
-
29
-
30
-
31
-
32
-
33
-
34
-
35
-
36
-
37
-
38
-
39
-
40
-
41
-
42
-
43
-
44
-
45
-
46
-
47
-
48
-
49
-
50
-
51
-
52
-
53
-
54
-
55
-
56
-
57
-
58
-
59
-
60
-
61
-
62
-
63
-
64
-
65
-
66
-
67
-
68
-
69
-
70
-
71
-
 72
72 -
 73
73 -
 74
74 -
 75
75 -
 76
76 -
 77
77 -
 78
78 -
 79
79 -
 80
80 -
 81
81 -
 82
82 -
83
-
84
-
85
-
86
-
87
-
88
-
89
-
90
-
91
-
92
-
93
-
94
-
95
-
96
-
97
-
98
-
99
-
100
-
101
-
102
-
103
-
104
-
105
-
106
-
107
-
108
-
109
-
110
-
111
-
112
-
113
-
114
 |
 |
