HP 418800-B21 HP StorageWorks 70 Modular Smart Array Enclosure User Guide (434 - Page 19
Installing hardware options, Installing disk drives, Disk drive options, Disk drive guidelines
 |
UPC - 882780564640
View all HP 418800-B21 manuals
Add to My Manuals
Save this manual to your list of manuals |
Page 19 highlights
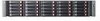
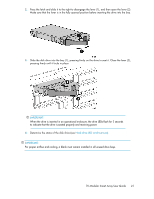
3. Slide the chassis into the rack. 4. Use the thumbscrews on the front of the chassis to secure it to the rack. 5. Use the shipping bracket to secure the enclosure for shipping: IMPORTANT: Use of the shipping bracket is required only when the rack is shipped with the enclosure installed. a. Loosen the thumbscrew on the shipping bracket. b. Slide the shipping bracket forward until it engages the chassis. c. Tighten the thumbscrew. If you are installing the enclosure into a telco rack, order the appropriate option kit at the RackSolutions website: http://www.racksolutions.com/hp. Follow the enclosure-specific instructions on the website to install the rack brackets. Installing hardware options Install hardware options, such as an additional I/O module, before initializing the enclosure. For installation information, see the documentation shipped with the module. Installing disk drives Disk drive options The enclosure supports up to 25 SAS or SATA disk drives. A variety of disk drive models are supported for use, including dual-ported and single-ported disk drives. For more information about supported disk drives, see the QuickSpecs for the disk enclosure, available on the MSA70 website. Disk drive guidelines When adding disk drives to the enclosure, observe the following general guidelines: 70 Modular Smart Array User Guide 19
-
 1
1 -
2
-
3
-
4
-
5
-
6
-
7
-
8
-
9
-
10
-
11
-
12
-
13
-
 14
14 -
 15
15 -
 16
16 -
 17
17 -
 18
18 -
 19
19 -
 20
20 -
 21
21 -
 22
22 -
 23
23 -
 24
24 -
25
-
26
-
27
-
28
-
29
-
30
-
31
-
32
-
33
-
34
-
35
-
36
-
37
-
38
-
39
-
40
-
41
-
42
-
43
-
44
-
45
-
46
-
47
-
48
-
49
-
50
-
51
-
52
-
53
-
54
-
55
-
56
-
57
-
58
-
59
-
60
 |
 |
