HP 418800-B21 HP StorageWorks 70 Modular Smart Array Enclosure User Guide (434 - Page 21
Modular Smart Array User Guide, pressing firmly until it locks in place
 |
UPC - 882780564640
View all HP 418800-B21 manuals
Add to My Manuals
Save this manual to your list of manuals |
Page 21 highlights
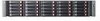
2. Press the latch and slide it to the right to disengage the lever (1), and then open the lever (2). Make sure that the lever is in the fully opened position before inserting the drive into the bay. 3. Slide the disk drive into the bay (1), pressing firmly on the drive to seat it. Close the lever (2), pressing firmly until it locks in place IMPORTANT: When the drive is inserted in an operational enclosure, the drive LEDs flash for 2 seconds to indicate that the drive is seated properly and receiving power. 4. Determine the status of the disk drive (see Hard drive LED combinations). IMPORTANT: For proper airflow and cooling, a blank must remain installed in all unused drive bays. 70 Modular Smart Array User Guide 21
-
 1
1 -
2
-
3
-
4
-
5
-
6
-
7
-
8
-
9
-
10
-
11
-
12
-
13
-
14
-
15
-
 16
16 -
 17
17 -
 18
18 -
 19
19 -
 20
20 -
 21
21 -
 22
22 -
 23
23 -
 24
24 -
 25
25 -
 26
26 -
27
-
28
-
29
-
30
-
31
-
32
-
33
-
34
-
35
-
36
-
37
-
38
-
39
-
40
-
41
-
42
-
43
-
44
-
45
-
46
-
47
-
48
-
49
-
50
-
51
-
52
-
53
-
54
-
55
-
56
-
57
-
58
-
59
-
60
 |
 |

2.
Press the latch and slide it to the right to disengage the lever (1), and then open the lever (2).
Make sure that the lever is in the fully opened position before inserting the drive into the bay.
3.
Slide the disk drive into the bay (1), pressing firmly on the drive to seat it. Close the lever (2),
pressing firmly until it locks in place
IMPORTANT:
When the drive is inserted in an operational enclosure, the drive LEDs flash for 2 seconds
to indicate that the drive is seated properly and receiving power.
4.
Determine the status of the disk drive (see
Hard drive LED combinations
).
IMPORTANT:
For proper airflow and cooling, a blank must remain installed in all unused drive bays.
70 Modular Smart Array User Guide
21