HP 4300n HP q2429a, q2430a, q2436a, q2437a - Maintenance Kit - Page 6
superior del mismo. Levante el rodillo y retírelo
 |
UPC - 808736314381
View all HP 4300n manuals
Add to My Manuals
Save this manual to your list of manuals |
Page 6 highlights
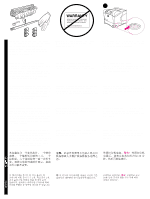
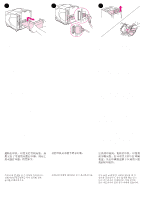
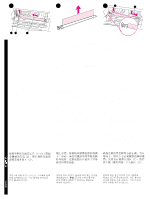
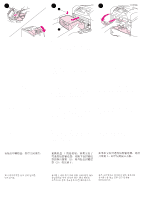
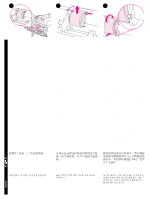
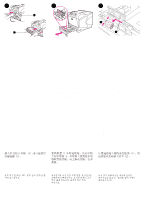
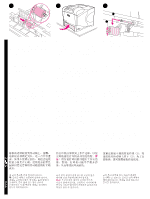
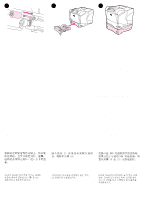
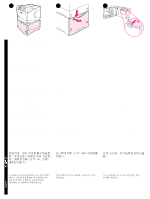
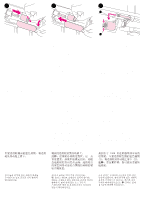
English Français 11 12 13 Locate the pickup roller at the center of tray 1. Release the roller by sliding apart the two latches located on each side at the top of the roller. Lift the roller out of the opening. Place the new pickup roller onto the shaft. Align the pin that is located on each side at the bottom of the roller with the slot in the bracket located on each side of the opening. Slide the roller into the printer until the roller snaps into place. Repérez le rouleau d'entraînement au centre du bac 1. Dégagez le rouleau en faisant glisser les deux loquets situés en haut du rouleau, de chaque côté. Soulevez le rouleau par l'ouverture. Placez le nouveau rouleau d'entraînement sur l'axe. Alignez la broche située en bas du rouleau, de chaque côté, sur la fente du support situé de part et d'autre de l'ouverture. Faites glisser le rouleau dans l'imprimante. Il doit s'enclencher. Die Einzugswalze befindet sich in der Mitte von Fach 1. Lösen Sie die Walze, indem Sie die beiden Verriegelungen außen an der Oberseite der Walze auseinander ziehen. Heben Sie die Walze an der Öffnung heraus. Setzen Sie die neue Einzugswalze an der Welle ein. Richten Sie die Stifte an der Unterseite der Walze an den Aussparungen der Halterungen außen an der Öffnung aus. Schieben Sie die Walze in den Drucker, bis sie hörbar einrastet. Posizionare il rullo di estrazione al centro del vassoio 1. Rilasciare il rullo facendo scorrere i due saliscendi che si trovano su ciascun lato nella parte superiore del rullo. Estrarre il rullo dall'apertura. Posizionare il nuovo rullo di estrazione nell'asta. Allineare il piedino che si trova su ciascun lato nella parte inferiore del rullo con l'alloggiamento nella staffa presente su ogni lato dell'apertura. Far scorrere il rullo nella stampante fino a quando non scatta in posizione. El rodillo de recogida está situado en la parte central de la bandeja 1. Libere el rodillo separando las dos palancas azules situadas a cada lado de la parte superior del mismo. Levante el rodillo y retírelo de su sitio por la abertura. Coloque el nuevo rodillo de recogida sobre el eje. Alinee los pasadores situados a ambos lados del rodillo (en su parte inferior) con los huecos de los soportes situados a un lado y otro de la abertura. Deslice el rodillo hasta que encaje en la impresora con un clic. Deutsch Italiano Español 5
-
 1
1 -
 2
2 -
 3
3 -
 4
4 -
 5
5 -
 6
6 -
 7
7 -
 8
8 -
 9
9 -
 10
10 -
 11
11 -
 12
12 -
13
-
14
-
15
-
16
-
17
-
18
-
19
-
20
 |
 |
