HP DL145 ProLiant DL100 Series Servers User Guide - Page 10
Installing hardware options, Installing the server into the rack, Powering up and configuring - rack kit
 |
UPC - 829160273594
View all HP DL145 manuals
Add to My Manuals
Save this manual to your list of manuals |
Page 10 highlights
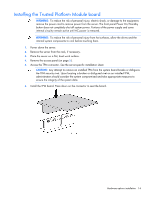
WARNING: To reduce the risk of personal injury or damage to the equipment, be sure that: • The leveling jacks are extended to the floor. • The full weight of the rack rests on the leveling jacks. • The stabilizing feet are attached to the rack if it is a single-rack installation. • The racks are coupled together in multiple-rack installations. • Only one component is extended at a time. A rack may become unstable if more than one component is extended for any reason. WARNING: To reduce the risk of personal injury or equipment damage when unloading a rack: • At least two people are needed to safely unload the rack from the pallet. An empty 42U rack can weigh as much as 115 kg (253 lb), can stand more than 2.1 m (7 ft) tall, and may become unstable when being moved on its casters. • Never stand in front of the rack when it is rolling down the ramp from the pallet. Always handle the rack from both sides. Installing hardware options Install any hardware options before initializing the server. For options installation information, refer to the option documentation. For server-specific information, refer to "Hardware options installation (on page 12)." Installing the server into the rack Refer to the installation instructions that ship with the rack kit to install the server into the rack. Powering up and configuring the server To power up the server, press the Power On/Standby button. For detailed information on configuring the server, see the server installation sheet. Installing the operating system To operate properly, the server must have a supported operating system. For the latest information on supported operating systems, see the HP website (http://www.hp.com/go/supportos). To install an operating system on the server, insert the operating system CD into the optional optical drive and reboot the server. This process may require you to obtain additional drivers from the Support CD shipped with the server or the CD that shipped with the option. Any drivers that require a diskette for installation will require an optional USB diskette drive. The drivers may have updates that are available on the HP website (http://www.hp.com/support). Follow the on-screen instructions to begin the installation process. Setup 10
-
 1
1 -
2
-
3
-
4
-
 5
5 -
 6
6 -
 7
7 -
 8
8 -
 9
9 -
 10
10 -
 11
11 -
 12
12 -
 13
13 -
 14
14 -
 15
15 -
16
-
17
-
18
-
19
-
20
-
21
-
22
-
23
-
24
-
25
-
26
-
27
-
28
-
29
-
30
-
31
-
32
-
33
-
34
-
35
-
36
-
37
-
38
-
39
-
40
-
41
-
42
-
43
-
44
-
45
-
46
-
47
-
48
-
49
-
50
-
51
-
52
-
53
-
54
-
55
-
56
-
57
-
58
-
59
-
60
-
61
-
62
-
63
-
64
-
65
-
66
-
67
-
68
-
69
-
70
-
71
-
72
-
73
-
74
-
75
-
76
-
77
-
78
-
79
-
80
-
81
 |
 |
