HP Designjet T2300 HP Designjet T2300 eMFP Printer series - Image Quality Trou - Page 29
Color fringing - accounting
 |
View all HP Designjet T2300 manuals
Add to My Manuals
Save this manual to your list of manuals |
Page 29 highlights
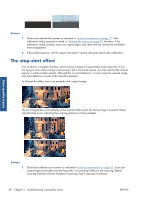
Scan-quality issues Actions 1. Make sure that you choose the correct paper type in the scan settings before scanning. 2. When dealing with copies, you must take into account that good color matching between a given original and its copy can be achieved only if both are printed on the same type of paper. In the case of scanned files, good color matching can be achieved only if your monitor is colorcalibrated or compliant with sRGB or AdobeRGB standards. 3. If the above conditions are met, you should also take into account that various scanner settings can affect the final color result, such as contrast, background cleaning, content type and paper type. To obtain the best possible colors, set contrast and background cleaning to 0, set the content type to Image, and select the most appropriate type of paper according to the original you are scanning (if in doubt, use photo paper). 4. Note that the image enhancement settings are automatically reset to default values after a certain time, so you may get a different result from copying the same original if you have not checked the settings before starting the job. 5. If you scanned to a PDF file, try opening the PDF file in Adobe Acrobat and saving it as a PDF/A file. For more information, see http://www.adobe.com/products/acrobat/standards.html (English only). 6. For optimum color results, clean and calibrate the scanner as indicated in Scanner maintenance on page 37. 7. Avoid placing the scanner in direct sunlight or near sources of heat or cold. Color fringing The problem called "color fringing" occurs when the scanner is affected by incorrect paper advance and/or miscalibration. Nevertheless, some amount of color fringing is unavoidable, especially at high scanning speeds. It can be seen at the borders of sharp black text over a white background, as in the example below (original on the left, scanned image on the right). Please note the black arrow indicating the scanning direction. Actions 1. Repeat the scan after increasing the scanner's resolution (choose Max quality if scanning, Best if copying). Turn your original 90 degrees, if possible, before scanning it again. 2. If the problem persists, clean and calibrate the scanner as indicated in Scanner maintenance on page 37. Repeat the scan at a high resolution (Max if scanning, Best if copying) and check whether the problem disappears. ENWW Color fringing 25
-
 1
1 -
2
-
3
-
4
-
5
-
6
-
7
-
8
-
9
-
10
-
11
-
12
-
13
-
14
-
15
-
16
-
17
-
18
-
19
-
20
-
21
-
22
-
23
-
 24
24 -
 25
25 -
 26
26 -
 27
27 -
 28
28 -
 29
29 -
 30
30 -
 31
31 -
 32
32 -
 33
33 -
 34
34 -
35
-
36
-
37
-
38
-
39
-
40
-
41
-
42
-
43
-
44
-
45
-
46
-
47
-
48
-
49
-
50
-
51
 |
 |
