HP Designjet T2300 HP Designjet T2300 eMFP Printer series - Image Quality Trou - Page 30
Clipping in dark or light areas - copy function
 |
View all HP Designjet T2300 manuals
Add to My Manuals
Save this manual to your list of manuals |
Page 30 highlights
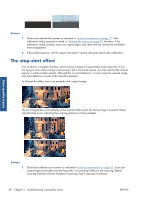
3. If the problem still persists, you can diagnose this issue by analyzing the patterns 6 and 8 (A to E) of the diagnostic plot. The black horizontal lines appear slightly colored at the top and bottom of each end (in the example on the right, below). Normally, they look red at the top and blue or green at the bottom, but it could be the other way around. If you see this effect, call HP support and report "color fringing problem after calibration". Clipping in dark or light areas Sometimes you may see that the scanned file or copy of one of your plots has lost detail in light or dark areas (or both), as in the example below: original on the left, scanned image on the right. Scan-quality issues Image © www.convincingblack.com, reproduced with permission. Actions 1. If you are making copies, and the original is printed on photographic paper, while you are copying it onto matte paper, this problem is to be expected. However, you can try to improve the result by running a color calibration of the printer (see Using your product), and by reducing contrast and background cleaning; this also applies if you see this problem in scanned files. 2. If the problem persists, repeat the scan or copy using a higher resolution (High or Max if scanning, Normal or Best if copying). Set the content type to Image, and make sure that the type of original selected in the front panel really corresponds to the paper type of your original (white, photo, recycled or translucent). If you are not sure, select photo. 3. If the problem persists, recalibrate the scanner as indicated in Scanner maintenance on page 37. Make sure you clean the maintenance sheet before calibrating the scanner, and check that the maintenance sheet is not damaged (if so, call HP support and ask for a new maintenance sheet). Re-scan your original after the calibration is completed. 4. If the problem persists, analyze patterns 16 (A to E) of the diagnostic plot. If you can distinguish lightness steps beyond the upper and lower specified thresholds, then the scanner is fine. Here you can see some examples of correct and incorrect functioning. 26 Chapter 3 Troubleshooting scan-quality issues ENWW
-
 1
1 -
2
-
3
-
4
-
5
-
6
-
7
-
8
-
9
-
10
-
11
-
12
-
13
-
14
-
15
-
16
-
17
-
18
-
19
-
20
-
21
-
22
-
23
-
24
-
 25
25 -
 26
26 -
 27
27 -
 28
28 -
 29
29 -
 30
30 -
 31
31 -
 32
32 -
 33
33 -
 34
34 -
 35
35 -
36
-
37
-
38
-
39
-
40
-
41
-
42
-
43
-
44
-
45
-
46
-
47
-
48
-
49
-
50
-
51
 |
 |
