HP Deskjet 3070A User Guide - Page 9
Status Lights, Wireless Status Light - test
 |
View all HP Deskjet 3070A manuals
Add to My Manuals
Save this manual to your list of manuals |
Page 9 highlights
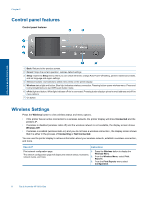
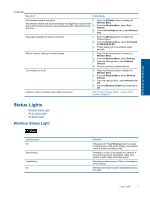
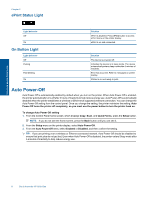
Get to know the HP All-in-One (continued) How do I? Instructions Print wireless network test report. 1. Press the Wireless button to display the The wireless network test report will display the diagnostics results for the Wireless Menu. status of the wireless network, wireless signal strength, detected networks, 2. From the Wireless Menu, select Print and more. Reports. 3. From the Print Reports menu select Wireless Test. View signal strength of wireless connection. 1. Press the Wireless button to display the Wireless Menu. 2. From the Wireless Menu, select Connected IP XXX.XXX.XX.XX. 3. Printer display will show wireless signal strength. Restore network settings to default settings. 1. Press the Wireless button to display the Wireless Menu. 2. From the Wireless Menu, select Settings. 3. From the Settings menu, select Restore Defaults. 4. Confirm selection to restore defaults. Turn wireless on or off. 1. Press the Wireless button to display the Wireless Menu. 2. From the Wireless Menu, select Wireless Settings. 3. From the Settings menu, select Wireless On/ Off. 4. From the Wireless On/Off menu select On or Off. Establish a Wi-Fi Protected Setup (WPS) connection. WiFi Protected Setup (WPS - requires WPS router) on page 33 Status Lights • Wireless Status Light • ePrint Status Light • On Button Light Wireless Status Light Light behavior Off Slow blinking Fast blinking On Solution Wireless is off. Press Wireless button to access wireless menu on the printer display. Use wireless menu to enable wireless printing. Wireless is on but not connected to a network. If connection cannot be established, make sure printer is within range of wireless signal. Wireless error has occurred. Refer to messages on printer display. Wireless connection has been established and you can print. Status Lights 7
-
 1
1 -
2
-
3
-
 4
4 -
 5
5 -
 6
6 -
 7
7 -
 8
8 -
 9
9 -
 10
10 -
 11
11 -
 12
12 -
 13
13 -
 14
14 -
15
-
16
-
17
-
18
-
19
-
20
-
21
-
22
-
23
-
24
-
25
-
26
-
27
-
28
-
29
-
30
-
31
-
32
-
33
-
34
-
35
-
36
-
37
-
38
-
39
-
40
-
41
-
42
-
43
-
44
-
45
-
46
-
47
-
48
-
49
-
50
-
51
-
52
-
53
-
54
-
55
-
56
-
57
-
58
-
59
-
60
 |
 |