HP Deskjet 450 HP Deskjet 450 - Getting Started Guide - Page 11
Schritt 6: Schließen Sie das Netzkabel an.
 |
UPC - 844844844303
View all HP Deskjet 450 manuals
Add to My Manuals
Save this manual to your list of manuals |
Page 11 highlights
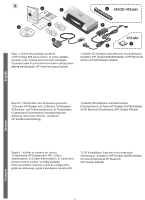
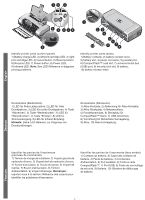
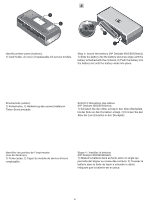
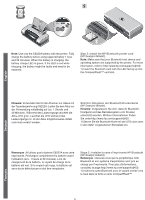
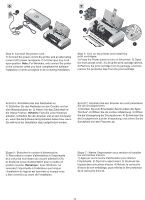
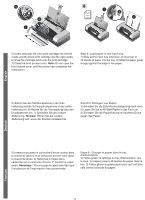
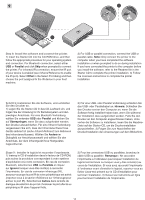
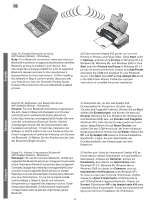
6 1 7 4 3 2 2 1 Step 6: Connect the power cord. 1) Connect the power cord to the printer and an alternating current (AC) power receptacle. 2) Lift the input tray to its open position. Note: For Windows, only connect the printer to the computer when you have completed the software installation or when prompted to do so during installation. Step 7: Turn on the printer and install the print cartridges. 1) Press the Power button to turn on the printer. 2) Open the front access cover. 3) Lift up the print cartridge latches. 4) Remove the print cartridge from its package, and then remove the protective tape from the print cartridge. Schritt 6: Schließen Sie das Netzkabel an. 1) Schließen Sie das Netzkabel an den Drucker und an eine Netzsteckdose an. 2) Heben Sie das Zufuhrfach in die offene Position. Hinweis: Falls Sie unter Windows arbeiten, schließen Sie den Drucker erst an den Computer an, wenn Sie die Software fertig installiert haben bzw. wenn Sie während der Installation dazu aufgefordert werden. Schritt 7: Schalten Sie den Drucker ein und installieren Sie die Druckpatronen. 1) Drücken Sie zum Einschalten des Druckers die Taste "Ein/Aus". 2) Öffnen Sie die vordere Abdeckung. 3) Öffnen Sie die Verriegelung der Druckpatronen. 4) Entnehmen Sie die Druckpatronen aus der Verpackung, und ziehen Sie die Schutzfolie von den Patronen ab. Etape 6 : Brancher le cordon d'alimentation. 1) Raccordez le cordon d'alimentation à l'imprimante et à une prise fournissant du courant alternatif (CA). 2) Soulevez le bac d'alimentation pour le mettre en position ouverte. Remarque : Avec Windows, ne raccordez l'imprimante à l'ordinateur que lorsque l'installation du logiciel est terminée ou lorsque vous y êtes convié(e) au cours de l'installation. Etape 7 : Mettre l'imprimante sous tension et installer les cartouches d'encre. 1) Appuyez sur la touche d'alimentation pour allumer l'imprimante. 2) Ouvrez le capot avant. 3) Soulevez les loquets des cartouches d'encre. 4) Retirez la cartouche d'encre de son emballage, puis enlevez le film protecteur de la cartouche d'encre.
-
 1
1 -
2
-
3
-
4
-
5
-
 6
6 -
 7
7 -
 8
8 -
 9
9 -
 10
10 -
 11
11 -
 12
12 -
 13
13 -
 14
14 -
 15
15 -
 16
16 -
17
-
18
-
19
-
20
-
21
-
22
-
23
-
24
-
25
-
26
-
27
-
28
-
29
-
30
-
31
-
32
-
33
-
34
-
35
-
36
-
37
-
38
-
39
-
40
-
41
-
42
-
43
-
44
-
45
-
46
-
47
-
48
-
49
-
50
-
51
-
52
-
53
-
54
-
55
-
56
-
57
-
58
-
59
-
60
-
61
-
62
-
63
-
64
-
65
-
66
-
67
-
68
-
69
-
70
-
71
-
72
-
73
-
74
-
75
-
76
-
77
-
78
-
79
-
80
 |
 |
