HP EliteBook 8460p Service Guide - Page 74
of the bezel, the inside edges of the left and right sides
 |
View all HP EliteBook 8460p manuals
Add to My Manuals
Save this manual to your list of manuals |
Page 74 highlights
3. Disconnect the power from the computer by first unplugging the power cord from the AC outlet, and then unplugging the AC adapter from the computer. 4. Remove the battery (see Battery on page 63). Remove the display assembly components: 1. Position the computer upright, with the front toward you. 2. Open the computer as far as possible. 3. To remove the display bezel, remove the two rubber screw covers (1) and the two Phillips PM2.5×5.0 screws (2) in the bottom corners of the display bezel. 4. Flex the top (1) of the bezel, the inside edges of the left and right sides (2), and then the bottom (3) of the bezel until it disengages from the display enclosure. 5. Remove the display bezel (4). 66 Chapter 4 Removal and replacement procedures
-
 1
1 -
2
-
3
-
4
-
5
-
6
-
7
-
8
-
9
-
10
-
11
-
12
-
13
-
14
-
15
-
16
-
17
-
18
-
19
-
20
-
21
-
22
-
23
-
24
-
25
-
26
-
27
-
28
-
29
-
30
-
31
-
32
-
33
-
34
-
35
-
36
-
37
-
38
-
39
-
40
-
41
-
42
-
43
-
44
-
45
-
46
-
47
-
48
-
49
-
50
-
51
-
52
-
53
-
54
-
55
-
56
-
57
-
58
-
59
-
60
-
61
-
62
-
63
-
64
-
65
-
66
-
67
-
68
-
 69
69 -
 70
70 -
 71
71 -
 72
72 -
 73
73 -
 74
74 -
 75
75 -
 76
76 -
 77
77 -
 78
78 -
 79
79 -
80
-
81
-
82
-
83
-
84
-
85
-
86
-
87
-
88
-
89
-
90
-
91
-
92
-
93
-
94
-
95
-
96
-
97
-
98
-
99
-
100
-
101
-
102
-
103
-
104
-
105
-
106
-
107
-
108
-
109
-
110
-
111
-
112
-
113
-
114
-
115
-
116
-
117
-
118
-
119
-
120
-
121
-
122
-
123
-
124
-
125
-
126
-
127
-
128
-
129
-
130
-
131
-
132
-
133
-
134
-
135
-
136
-
137
-
138
-
139
-
140
-
141
-
142
-
143
-
144
-
145
-
146
-
147
-
148
-
149
-
150
-
151
-
152
-
153
-
154
-
155
-
156
-
157
-
158
-
159
-
160
-
161
 |
 |

3.
Disconnect the power from the computer by first unplugging the power cord from the AC outlet,
and then unplugging the AC adapter from the computer.
4.
Remove the battery (see
Battery
on page
63
).
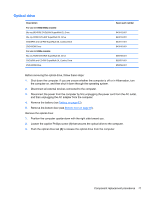
Remove the display assembly components:
1.
Position the computer upright, with the front toward you.
2.
Open the computer as far as possible.
3.
To remove the display bezel, remove the two rubber screw covers
(1)
and the two Phillips
PM2.5×5.0 screws
(2)
in the bottom corners of the display bezel.
4.
Flex the top
(1)
of the bezel, the inside edges of the left and right sides
(2)
, and then the bottom
(3)
of the bezel until it disengages from the display enclosure.
5.
Remove the display bezel
(4)
.
66
Chapter 4
Removal and replacement procedures