HP EliteBook 8460p Service Guide - Page 76
and then rotate the panel assembly downward so it lies flat in the, display enclosure
 |
View all HP EliteBook 8460p manuals
Add to My Manuals
Save this manual to your list of manuals |
Page 76 highlights
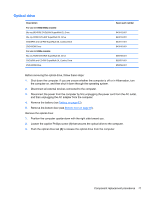
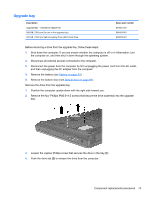
12. Slide the display panel up and out of the hinges (3). Reverse this procedure to reassemble and install the display assembly components. When replacing the display panel, after connecting the display cable, slide the panel into the bracket (1), replace the screws (2), and then rotate the panel assembly downward so it lies flat in the enclosure (3). Make sure to insert the display panel brackets into the notches in the corners of the display enclosure (4). 68 Chapter 4 Removal and replacement procedures
-
 1
1 -
2
-
3
-
4
-
5
-
6
-
7
-
8
-
9
-
10
-
11
-
12
-
13
-
14
-
15
-
16
-
17
-
18
-
19
-
20
-
21
-
22
-
23
-
24
-
25
-
26
-
27
-
28
-
29
-
30
-
31
-
32
-
33
-
34
-
35
-
36
-
37
-
38
-
39
-
40
-
41
-
42
-
43
-
44
-
45
-
46
-
47
-
48
-
49
-
50
-
51
-
52
-
53
-
54
-
55
-
56
-
57
-
58
-
59
-
60
-
61
-
62
-
63
-
64
-
65
-
66
-
67
-
68
-
69
-
70
-
 71
71 -
 72
72 -
 73
73 -
 74
74 -
 75
75 -
 76
76 -
 77
77 -
 78
78 -
 79
79 -
 80
80 -
 81
81 -
82
-
83
-
84
-
85
-
86
-
87
-
88
-
89
-
90
-
91
-
92
-
93
-
94
-
95
-
96
-
97
-
98
-
99
-
100
-
101
-
102
-
103
-
104
-
105
-
106
-
107
-
108
-
109
-
110
-
111
-
112
-
113
-
114
-
115
-
116
-
117
-
118
-
119
-
120
-
121
-
122
-
123
-
124
-
125
-
126
-
127
-
128
-
129
-
130
-
131
-
132
-
133
-
134
-
135
-
136
-
137
-
138
-
139
-
140
-
141
-
142
-
143
-
144
-
145
-
146
-
147
-
148
-
149
-
150
-
151
-
152
-
153
-
154
-
155
-
156
-
157
-
158
-
159
-
160
-
161
 |
 |

12.
Slide the display panel up and out of the hinges
(3)
.
Reverse this procedure to reassemble and install the display assembly components.
When replacing the display panel, after connecting the display cable, slide the panel into the bracket
(1)
, replace the screws
(2)
, and then rotate the panel assembly downward so it lies flat in the
enclosure
(3)
. Make sure to insert the display panel brackets into the notches in the corners of the
display enclosure
(4)
.
68
Chapter 4
Removal and replacement procedures