HP J4865A User Manual - Page 21
Installing the Series 4100gl Switches, Included Parts - warranty
 |
View all HP J4865A manuals
Add to My Manuals
Save this manual to your list of manuals |
Page 21 highlights
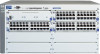
2 Installing the Series 4100gl Switches Installing the Series 4100gl Switches The HP Series 4100gl Switches are easily installed. They come with an acces sory kit that includes the brackets for mounting the switch in a standard 19inch telco rack, in an equipment cabinet, or on a wall. The switches have rubber feet already attached so they can be securely located on a horizontal surface. This chapter shows you how to install the Series 4100gl Switches. Included Parts The Series 4100gl Switches and Bundles have the following components shipped with them: ■ HP ProCurve Series 4100gl Switches Installation Guide (5990-3005), this manual ■ HP ProCurve Series 4100gl Switches Documentation CD ROM (contains a PDF file copies of the HP ProCurve Series 4100gl Switches Management and Configuration Guide, this Installation and Getting Started Guide, and other related documentation) ■ HP ProCurve Manager for Hubs & Switches - CD ROM and booklet ■ Customer Support/Warranty booklet ■ Accessory kit (5065-6521 for the 8-slot Switch 4108gl and Switch 4108gl Bundle; 5064-9943 for the 4-slot Switch 4104gl and Switch 4148gl): • two mounting brackets • six or four 10 mm M4 screws to attach the mounting brackets to the switch • four 5/8-inch number 12-24 screws to attach the switch to a rack ■ Console cable ■ Power cord, one of the following: Australia/New Zealand China Continental Europe Denmark Japan 8120-6803 8120-8377 8120-6802 8120-6806 8121-0606 Switzerland United Kingdom/ Hong Kong/Singapore United States/Canada/Mexico 8120-6807 8120-8709 8121-0605 2-1
-
 1
1 -
2
-
3
-
4
-
5
-
6
-
7
-
8
-
9
-
10
-
11
-
12
-
13
-
14
-
15
-
 16
16 -
 17
17 -
 18
18 -
 19
19 -
 20
20 -
 21
21 -
 22
22 -
 23
23 -
 24
24 -
 25
25 -
 26
26 -
27
-
28
-
29
-
30
-
31
-
32
-
33
-
34
-
35
-
36
-
37
-
38
-
39
-
40
-
41
-
42
-
43
-
44
-
45
-
46
-
47
-
48
-
49
-
50
-
51
-
52
-
53
-
54
-
55
-
56
-
57
-
58
-
59
-
60
-
61
-
62
-
63
-
64
-
65
-
66
-
67
-
68
-
69
-
70
-
71
-
72
-
73
-
74
-
75
-
76
-
77
-
78
-
79
-
80
-
81
-
82
-
83
-
84
-
85
-
86
-
87
-
88
-
89
-
90
-
91
-
92
-
93
-
94
 |
 |
