HP J4865A User Manual - Page 28
Installing the Series 4100gl, Switches, Low-force connector., For best results, push near both screws
 |
View all HP J4865A manuals
Add to My Manuals
Save this manual to your list of manuals |
Page 28 highlights
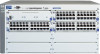
Installing the Series 4100gl Switches Installation Procedures 1. Insert module into the guides and slide it in until it is fully inserted. "Low-force" connector. High insertion force is not needed and should not be used. Installing the Series 4100gl Switches The module is fully inserted when the module bulkhead is contacting, or very close to contacting the face of the switch. For best results, push near both screws. 2. Then tighten the retaining screws on the module until they are secure, but do not overtighten them. 2-8
-
 1
1 -
2
-
3
-
4
-
5
-
6
-
7
-
8
-
9
-
10
-
11
-
12
-
13
-
14
-
15
-
16
-
17
-
18
-
19
-
20
-
21
-
22
-
 23
23 -
 24
24 -
 25
25 -
 26
26 -
 27
27 -
 28
28 -
 29
29 -
 30
30 -
 31
31 -
 32
32 -
 33
33 -
34
-
35
-
36
-
37
-
38
-
39
-
40
-
41
-
42
-
43
-
44
-
45
-
46
-
47
-
48
-
49
-
50
-
51
-
52
-
53
-
54
-
55
-
56
-
57
-
58
-
59
-
60
-
61
-
62
-
63
-
64
-
65
-
66
-
67
-
68
-
69
-
70
-
71
-
72
-
73
-
74
-
75
-
76
-
77
-
78
-
79
-
80
-
81
-
82
-
83
-
84
-
85
-
86
-
87
-
88
-
89
-
90
-
91
-
92
-
93
-
94
 |
 |

Installing the Series 4100gl Switches
Installation Procedures
1.
Insert module into the
guides and slide it in until it is
fully inserted
.
“Low-force” connector.
High insertion force is not
needed and should not be
used.
For best results,
push near both screws
.
Installing the Series 4100gl
Switches
2.
Then tighten the retaining
screws on the module until they are
secure, but do not overtighten
them.
The module is fully inserted when
the module bulkhead is contacting,
or very close to contacting
the face of the switch.
2-8±