HP Jetdirect 380x HP Wireless Print Server 380x - (English) Setup Guide - Page 25
lights, test button, to printer, to power, Installing the Print Server Hardware 2-3
 |
View all HP Jetdirect 380x manuals
Add to My Manuals
Save this manual to your list of manuals |
Page 25 highlights
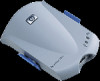
3. Plug the DC power cord from the power module-shipped with the print server-into the power connector on the rear end of the print server. Plug the power module into a power outlet. to printer lights test button to power 4. Wait two minutes for the print server to initialize, and then verify the connection with the printer by printing a configuration (test) page: Briefly press and release the test button on the rear end of the print server. The page should soon emerge from the attached printer. If the page does not appear on the printer, or if it is unreadable, see page 5-4. Installing the Print Server Hardware 2-3
-
 1
1 -
2
-
3
-
4
-
5
-
6
-
7
-
8
-
9
-
10
-
11
-
12
-
13
-
14
-
15
-
16
-
17
-
18
-
19
-
 20
20 -
 21
21 -
 22
22 -
 23
23 -
 24
24 -
 25
25 -
 26
26 -
 27
27 -
 28
28 -
 29
29 -
 30
30 -
31
-
32
-
33
-
34
-
35
-
36
-
37
-
38
-
39
-
40
-
41
-
42
-
43
-
44
-
45
-
46
-
47
-
48
-
49
-
50
-
51
-
52
-
53
-
54
-
55
-
56
-
57
-
58
-
59
-
60
-
61
-
62
-
63
-
64
-
65
-
66
-
67
-
68
-
69
-
70
-
71
-
72
-
73
-
74
-
75
-
76
-
77
-
78
-
79
-
80
-
81
-
82
-
83
-
84
-
85
-
86
-
87
-
88
 |
 |

Installing the Print Server Hardware 2-3
3.
Plug the DC power cord from the power module—shipped with the print server—into
the power connector on the rear end of the print server. Plug the power module into a
power outlet.
4.
Wait two minutes for the print server to initialize, and then verify the connection with
the printer by printing a configuration (test) page:
Briefly press and release the test button
on the rear end of the print server. The page
should soon emerge from the attached printer. If the page does not appear on the
printer, or if it is unreadable, see page 5-4.
lights
test button
to printer
to power