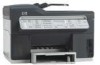
HP L7580 User Guide - Page 69
Print panoramic photos, Scan Proof Sheet
 |
UPC - 882780620650
View all HP L7580 manuals
Add to My Manuals
Save this manual to your list of manuals |
Page 69 highlights
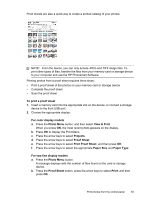
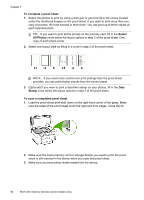
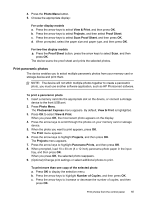
4. Press the Photo Menu button. 5. Choose the appropriate display: For color display models a. Press the arrow keys to select View & Print, and then press OK. b. Press the arrow keys to select Projects, and then select Proof Sheet. c. Press the arrow keys to select Scan Proof Sheet, and then press OK. d. When prompted, select the paper size and paper type, and then press OK. For two-line display models ▲ Press the Proof Sheet button, press the arrow keys to select Scan, and then press OK. The device scans the proof sheet and prints the selected photos. Print panoramic photos The device enables you to select multiple panoramic photos from your memory card or storage device and print them. NOTE: The device will not stitch multiple photos together to create a panoramic photo, you must use another software application, such as HP Photosmart software. To print a panoramic photo 1. Insert a memory card into the appropriate slot on the device, or connect a storage device to the front USB port. 2. Press Photo Menu. The Photosmart Express menu appears. By default, View & Print is highlighted. 3. Press OK to select View & Print. When you press OK, the most recent photo appears on the display. 4. Press the arrow keys to scroll through the photos on your memory card or storage device. 5. When the photo you want to print appears, press OK. The Print menu appears. 6. Press the arrow keys to highlight Projects, and then press OK. The Projects menu appears. 7. Press the arrow keys to highlight Panorama Prints, and then press OK. 8. When prompted, load 10 x 30 cm (4 x 12 inch) panorama photo paper in the input tray, and then press OK. When you press OK, the selected photo reappears. 9. (Optional) Change print settings or select additional photos to print. To print more than one copy of the selected photo a. Press OK to display the selection menu. b. Press the arrow keys to highlight Number of Copies, and then press OK. c. Press the arrow keys to increase or decrease the number of copies, and then press OK. Print photos from the control panel 65
-
 1
1 -
2
-
3
-
4
-
5
-
6
-
7
-
8
-
9
-
10
-
11
-
12
-
13
-
14
-
15
-
16
-
17
-
18
-
19
-
20
-
21
-
22
-
23
-
24
-
25
-
26
-
27
-
28
-
29
-
30
-
31
-
32
-
33
-
34
-
35
-
36
-
37
-
38
-
39
-
40
-
41
-
42
-
43
-
44
-
45
-
46
-
47
-
48
-
49
-
50
-
51
-
52
-
53
-
54
-
55
-
56
-
57
-
58
-
59
-
60
-
61
-
62
-
63
-
 64
64 -
 65
65 -
 66
66 -
 67
67 -
 68
68 -
 69
69 -
 70
70 -
 71
71 -
 72
72 -
 73
73 -
 74
74 -
75
-
76
-
77
-
78
-
79
-
80
-
81
-
82
-
83
-
84
-
85
-
86
-
87
-
88
-
89
-
90
-
91
-
92
-
93
-
94
-
95
-
96
-
97
-
98
-
99
-
100
-
101
-
102
-
103
-
104
-
105
-
106
-
107
-
108
-
109
-
110
-
111
-
112
-
113
-
114
-
115
-
116
-
117
-
118
-
119
-
120
-
121
-
122
-
123
-
124
-
125
-
126
-
127
-
128
-
129
-
130
-
131
-
132
-
133
-
134
-
135
-
136
-
137
-
138
-
139
-
140
-
141
-
142
-
143
-
144
-
145
-
146
-
147
-
148
-
149
-
150
-
151
-
152
-
153
-
154
-
155
-
156
-
157
-
158
-
159
-
160
-
161
-
162
-
163
-
164
-
165
-
166
-
167
-
168
-
169
-
170
-
171
-
172
-
173
-
174
-
175
-
176
-
177
-
178
-
179
-
180
-
181
-
182
-
183
-
184
-
185
-
186
-
187
-
188
-
189
-
190
-
191
-
192
-
193
-
194
-
195
-
196
-
197
-
198
-
199
-
200
-
201
-
202
-
203
-
204
-
205
-
206
-
207
-
208
-
209
-
210
-
211
-
212
-
213
-
214
-
215
-
216
-
217
-
218
-
219
-
220
-
221
-
222
-
223
-
224
-
225
-
226
-
227
-
228
-
229
-
230
-
231
-
232
-
233
-
234
-
235
-
236
-
237
-
238
-
239
-
240
-
241
-
242
-
243
-
244
-
245
 |
 |