HP LaserJet 9040/9050 HP LaserJet 9040mfp/9050mfp - (multiple language) Gettin - Page 31
Step 15. Con embedded Send to e-mail, English, Con Device, Sending, E-mail
 |
View all HP LaserJet 9040/9050 manuals
Add to My Manuals
Save this manual to your list of manuals |
Page 31 highlights
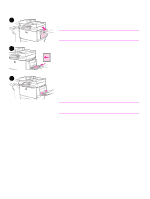
English Step 15. Configure embedded Send to e-mail Note Note To use the send to e-mail feature, the MFP must be connected to an IP network and configured with the IP address or hostname of a Simple Mail Transfer Protocol (SMTP) server. Optionally, the MFP can be configured to use a V2 or V3 Lightweight Directory Access Protocol (LDAP). When the MFP is configured to use an LDAP address book, users can more easily address send-to-e-mail jobs by typing a recipient's name instead of typing the recipient's full SMTP e-mail address. As the user types the recipient's name, the MFP searches the LDAP address book for matching names and automatically fills the address field with the closest match. When the user selects a specific recipient, the MFP uses LDAP to obtain the recipient's full SMTP e-mail address. If you do not know the IP address or hostname of the SMTP or LDAP servers on your network, ask your network or e-mail administrator for this information. On the touch screen of the graphical display: 1 Touch Menu. 2 Touch Configure Device. 3 Touch Sending. 4 Touch E-mail. 5 You can touch Find Send Gateways to let the product search the local network for LDAP and SMTP servers. If this is successful, proceed to step 8. Otherwise, proceed to step 6. 6 Touch SMTP Gateway on the screen, and then enter the IP address or hostname of the SMTP server. 7 Touch OK. 8 Touch Test Send Gateways to test the configuration. For additional information about finding the IP addresses of the SMTP and LDAP servers, and for alternate procedures for configuring the product for digital sending, see the use guide. ENWW Configure embedded Send to e-mail 29
-
 1
1 -
2
-
3
-
4
-
5
-
6
-
7
-
8
-
9
-
10
-
11
-
12
-
13
-
14
-
15
-
16
-
17
-
18
-
19
-
20
-
21
-
22
-
23
-
24
-
25
-
 26
26 -
 27
27 -
 28
28 -
 29
29 -
 30
30 -
 31
31 -
 32
32 -
 33
33 -
 34
34 -
 35
35 -
 36
36 -
37
-
38
-
39
-
40
-
41
-
42
-
43
-
44
-
45
-
46
-
47
-
48
-
49
-
50
-
51
-
52
-
53
-
54
-
55
-
56
-
57
-
58
-
59
-
60
-
61
-
62
-
63
-
64
-
65
-
66
-
67
-
68
-
69
-
70
-
71
-
72
-
73
-
74
-
75
-
76
-
77
-
78
-
79
-
80
-
81
-
82
-
83
-
84
-
85
-
86
-
87
-
88
-
89
-
90
-
91
-
92
-
93
-
94
-
95
-
96
-
97
-
98
-
99
-
100
-
101
-
102
-
103
-
104
-
105
-
106
-
107
-
108
-
109
-
110
-
111
-
112
-
113
-
114
-
115
-
116
-
117
-
118
-
119
-
120
-
121
-
122
-
123
-
124
-
125
-
126
-
127
-
128
-
129
-
130
-
131
-
132
-
133
-
134
-
135
-
136
-
137
-
138
-
139
-
140
-
141
-
142
-
143
-
144
-
145
-
146
-
147
-
148
-
149
-
150
-
151
-
152
-
153
-
154
-
155
-
156
-
157
-
158
-
159
-
160
-
161
-
162
-
163
-
164
-
165
-
166
-
167
-
168
-
169
-
170
-
171
-
172
-
173
-
174
-
175
-
176
-
177
-
178
-
179
-
180
-
181
-
182
-
183
-
184
-
185
-
186
-
187
-
188
-
189
-
190
-
191
-
192
-
193
-
194
-
195
-
196
-
197
-
198
-
199
-
200
-
201
-
202
-
203
-
204
-
205
-
206
-
207
-
208
-
209
-
210
-
211
-
212
-
213
-
214
-
215
-
216
-
217
-
218
-
219
-
220
-
221
-
222
-
223
-
224
-
225
-
226
-
227
-
228
-
229
-
230
-
231
-
232
-
233
-
234
-
235
-
236
-
237
-
238
-
239
-
240
-
241
-
242
-
243
-
244
-
245
-
246
-
247
-
248
-
249
-
250
-
251
-
252
-
253
-
254
-
255
-
256
-
257
-
258
-
259
-
260
-
261
-
262
-
263
-
264
-
265
-
266
-
267
-
268
-
269
-
270
-
271
-
272
-
273
-
274
-
275
-
276
-
277
-
278
-
279
-
280
-
281
-
282
-
283
-
284
-
285
-
286
-
287
-
288
 |
 |