HP LaserJet M9040/M9050 HP LaserJet M9040/M9050 MFP Embedded Web Server - User - Page 73
Editing or viewing a predefined folder, Removing a predefined folder, Removing all folders
 |
View all HP LaserJet M9040/M9050 manuals
Add to My Manuals
Save this manual to your list of manuals |
Page 73 highlights
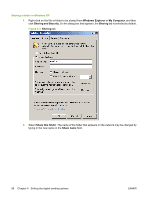
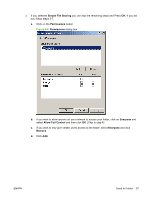
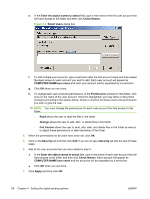
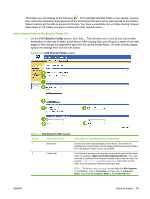
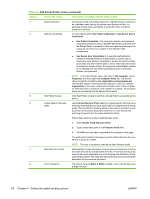
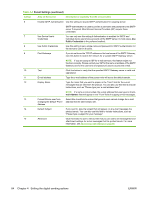
Table 4-3 Add Shared Folder screen (continued) Callout Area on the screen Information or capability that the area provides 9 Resolution 10 Default file size The higher the resolution, the better the image quality will be. However the higher the resolution, the larger the file size will be. This setting provides for different levels of compression. If you choose Small, the file size will be smaller, but the image quality might be lower. If you choose Large, image quality will be better, but the file size will be larger. The Standard setting provides for average compression. NOTE: If you want the smallest file size, choose the Black & White color preference setting, choose the lowest resolution setting, and Small for the default file size. If you want higher image quality, choose from the other available settings. Note that the default setting: PDF, Color, 150DPI, and Standard file size typically provides the best quality with reasonable file sizes. 2. After adding and configuring the shared folder and clicking OK, you will return to this page. The new shared folder will appear in the Predefined Folders list. The alias name for each folder will be shown in the list. Editing or viewing a predefined folder Follow these steps to edit or view a predefined folder. 1. Select a folder from the Predefined Folders list by clicking on the folder name. 2. Click Edit, and you will go to a new web page to view or change the settings for the predefined folder. Then, click the OK button to return back to this page if you change settings or the Cancel button if you don't make changes. Removing a predefined folder Follow these steps to remove a predefined folder from the device: 1. Select a folder from the Predefined Folders list by clicking on the folder name. 2. Click Remove... and click OK to confirm. The selected folder destination will be removed from the device. 3. Repeat the above steps to remove additional folders, or use the Remove All button as described below. Removing all folders Follow these steps to remove all folders from the device: 1. Click Remove All. 2. Click OK to confirm. All folders will be removed. Testing a predefined folder Follow these steps to test that a predefined folder is accessible by the device. 1. Select a folder from the Predefined Folders list. 2. Click Test Folder Access. If device user's credentials are to be used to access the folder, you will need to provide the user credentials when prompted to complete the test. ENWW Send to Folder 61
-
 1
1 -
2
-
3
-
4
-
5
-
6
-
7
-
8
-
9
-
10
-
11
-
12
-
13
-
14
-
15
-
16
-
17
-
18
-
19
-
20
-
21
-
22
-
23
-
24
-
25
-
26
-
27
-
28
-
29
-
30
-
31
-
32
-
33
-
34
-
35
-
36
-
37
-
38
-
39
-
40
-
41
-
42
-
43
-
44
-
45
-
46
-
47
-
48
-
49
-
50
-
51
-
52
-
53
-
54
-
55
-
56
-
57
-
58
-
59
-
60
-
61
-
62
-
63
-
64
-
65
-
66
-
67
-
 68
68 -
 69
69 -
 70
70 -
 71
71 -
 72
72 -
 73
73 -
 74
74 -
 75
75 -
 76
76 -
 77
77 -
 78
78 -
79
-
80
-
81
-
82
-
83
-
84
-
85
-
86
-
87
-
88
-
89
-
90
-
91
-
92
-
93
-
94
-
95
-
96
-
97
-
98
-
99
-
100
-
101
-
102
-
103
-
104
-
105
-
106
 |
 |
