HP P2055d HP LaserJet P2050 Series - User Guide - Page 101
Enable memory for Windows, Windows 2000, Windows XP - driver download xp
 |
UPC - 884962230343
View all HP P2055d manuals
Add to My Manuals
Save this manual to your list of manuals |
Page 101 highlights
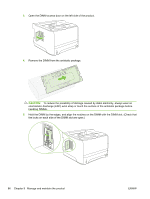
Use the following guidelines if you use the page description language (PDL) ability to mark resources as permanent. For technical details, see an appropriate PDL reference for PCL or PS. ● Mark resources as permanent only when it is absolutely necessary that they remain in memory while the product is turned on. ● Send permanent resources to the product only at the beginning of a print job and not while the product is printing. NOTE: Overusing permanent resources or downloading them while the product is printing might affect product performance or the ability to print complex pages. Enable memory for Windows 1. Windows XP and Windows Server 2003 (using the default Start menu view): Click Start, click Settings, and then click Printers and Faxes. -or- Windows 2000, Windows XP, and Windows Server 2003 (using the Classic Start menu view): Click Start, click Settings, and then click Printers. -or- Windows Vista: Click Start, click Control Panel, and then in the category for Hardware and Sound click Printer. 2. Right-click the driver icon, and then select Properties. 3. Click the Device Settings tab. 4. Expand the area for Installable Options. 5. Next to Printer Memory, select the total amount of memory that is installed. 6. Click OK. ENWW Install memory 89
-
 1
1 -
2
-
3
-
4
-
5
-
6
-
7
-
8
-
9
-
10
-
11
-
12
-
13
-
14
-
15
-
16
-
17
-
18
-
19
-
20
-
21
-
22
-
23
-
24
-
25
-
26
-
27
-
28
-
29
-
30
-
31
-
32
-
33
-
34
-
35
-
36
-
37
-
38
-
39
-
40
-
41
-
42
-
43
-
44
-
45
-
46
-
47
-
48
-
49
-
50
-
51
-
52
-
53
-
54
-
55
-
56
-
57
-
58
-
59
-
60
-
61
-
62
-
63
-
64
-
65
-
66
-
67
-
68
-
69
-
70
-
71
-
72
-
73
-
74
-
75
-
76
-
77
-
78
-
79
-
80
-
81
-
82
-
83
-
84
-
85
-
86
-
87
-
88
-
89
-
90
-
91
-
92
-
93
-
94
-
95
-
 96
96 -
 97
97 -
 98
98 -
 99
99 -
 100
100 -
 101
101 -
 102
102 -
 103
103 -
 104
104 -
 105
105 -
 106
106 -
107
-
108
-
109
-
110
-
111
-
112
-
113
-
114
-
115
-
116
-
117
-
118
-
119
-
120
-
121
-
122
-
123
-
124
-
125
-
126
-
127
-
128
-
129
-
130
-
131
-
132
-
133
-
134
-
135
-
136
-
137
-
138
-
139
-
140
-
141
-
142
-
143
-
144
-
145
-
146
-
147
-
148
-
149
-
150
-
151
-
152
-
153
-
154
-
155
-
156
-
157
-
158
-
159
-
160
-
161
-
162
-
163
-
164
-
165
-
166
-
167
-
168
-
169
-
170
-
171
-
172
-
173
-
174
-
175
-
176
 |
 |
