HP Pavilion zt1100 HP Pavilion Notebook PC ZE1000 Series - Startup Guide - Page 17
Setting Up Your Notebook
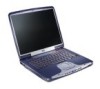 |
View all HP Pavilion zt1100 manuals
Add to My Manuals
Save this manual to your list of manuals |
Page 17 highlights
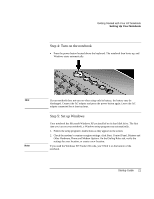
Getting Started with Your HP Notebook Setting Up Your Notebook Setting Up Your Notebook WARNING Improper use of keyboards and other input devices has been associated with ergonomic injury. For information about reducing your risk, see "Working in Comfort" in the online HP Library, or visit our ergonomics web site, www.hp.com/ergo. For a summary about working with a notebook computer, see "Working in Comfort with a Notebook PC" on page 29. If you are using your notebook as your primary computer, or using it for extended periods, you should use it with a full-size keyboard, monitor, and mouse. This can reduce the risk of ergonomic injury. See "Working in Comfort" in the online HP Library. When you set up your notebook for the first time, you'll need to install and charge the battery, connect the AC adapter and a phone line, turn on the notebook, run the Windows setup program, and register the notebook. "Your notebook comes with an AC adapter rated at 75W. Older HP AC adapters were only rated at 60W. To ensure that your computer operates properly, please be sure that you use only the adapter supplied with this notebook. If it is necessary to replace your adapter, hp recommends you verify that you use only those adapters specifically approved for this model computer." WARNING Step 1: Install the battery Do not mutilate or puncture batteries. Do not dispose of batteries in fire, or they can burst or explode, releasing hazardous chemicals. Rechargeable batteries must be recycled or disposed of properly. Your notebook is shipped with the battery installed. If the battery has been removed, install it as follows: Startup Guide 17
-
 1
1 -
2
-
3
-
4
-
5
-
6
-
7
-
8
-
9
-
10
-
11
-
 12
12 -
 13
13 -
 14
14 -
 15
15 -
 16
16 -
 17
17 -
 18
18 -
 19
19 -
 20
20 -
 21
21 -
 22
22 -
23
-
24
-
25
-
26
-
27
-
28
-
29
-
30
-
31
-
32
-
33
-
34
-
35
-
36
-
37
-
38
-
39
-
40
-
41
-
42
-
43
-
44
-
45
-
46
-
47
-
48
-
49
-
50
-
51
-
52
-
53
-
54
-
55
-
56
-
57
-
58
-
59
-
60
-
61
-
62
-
63
-
64
-
65
-
66
-
67
-
68
-
69
-
70
 |
 |
