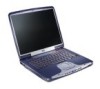
HP Pavilion zt1100 HP Pavilion Notebook PC ZE1000 Series - Startup Guide - Page 19
Step 2: Connect AC power
 |
View all HP Pavilion zt1100 manuals
Add to My Manuals
Save this manual to your list of manuals |
Page 19 highlights
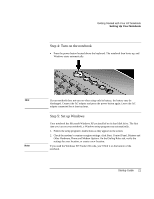
Getting Started with Your HP Notebook Setting Up Your Notebook CAUTION Step 2: Connect AC power Use only the 75-watt HP AC adapter included with your notebook, or another HP approved adapter. Using any other AC adapter can damage the notebook, and may void your warranty-see the warranty statement on page 58. The pre-installed electronic online manual on your notebook may refer to the use of a 60-watt AC adapter designed for an earlier released product. A 60-watt AC adapter should not be used with this current product. • Plug the AC adapter into the power source (the adapter's LED lights), then connect it to the AC adapter jack on the back of the notebook. The notebook's battery then begins charging. While the battery is charging, you can continue with step 3. Startup Guide 19
-
 1
1 -
2
-
3
-
4
-
5
-
6
-
7
-
8
-
9
-
10
-
11
-
12
-
13
-
 14
14 -
 15
15 -
 16
16 -
 17
17 -
 18
18 -
 19
19 -
 20
20 -
 21
21 -
 22
22 -
 23
23 -
 24
24 -
25
-
26
-
27
-
28
-
29
-
30
-
31
-
32
-
33
-
34
-
35
-
36
-
37
-
38
-
39
-
40
-
41
-
42
-
43
-
44
-
45
-
46
-
47
-
48
-
49
-
50
-
51
-
52
-
53
-
54
-
55
-
56
-
57
-
58
-
59
-
60
-
61
-
62
-
63
-
64
-
65
-
66
-
67
-
68
-
69
-
70
 |
 |
