HP Photosmart 1218 HP Photosmart 1215/1218 Color Printer - (English) User Guid - Page 23
Getting to know your printer, Adjusting printer settings, Printing a test size - manual
 |
View all HP Photosmart 1218 manuals
Add to My Manuals
Save this manual to your list of manuals |
Page 23 highlights
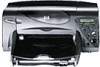
Chapter 2 Getting to know your printer Adjusting printer settings You can use the Tools button on the printer's front panel to print a test page or adjust the printer's settings. Note: An asterisk (*) on the LCD indicates the current setting. Printing a test page You can print a test page to check your print cartridges and make sure the paper is loaded correctly. To print a test page: 1. Make sure plain paper is loaded in the paper tray. If you need more information, see "Loading paper" on page 11. 2. On the printer front panel, press Tools until the LCD asks if you want to print a test page, then press OK/Yes. Test page The printer begins printing a test page. Page size By default, the printer automatically detects paper type and size by scanning the paper in the paper tray. You can also choose to override the automatic detection by manually setting paper type and size. Depending on where you live, you may need to set the printer to use a particular small or large paper size. If you live in Japan, you need to set the default small paper size to either Hagaki or 4 x 6 inches. If you live in any other Asian or Pacific country, you need to set the default large paper size to either A4 or 8½ x 11 inches. LCD OK/Yes button Tools button www.hp.com/photosmart 17
-
 1
1 -
2
-
3
-
4
-
5
-
6
-
7
-
8
-
9
-
10
-
11
-
12
-
13
-
14
-
15
-
16
-
17
-
 18
18 -
 19
19 -
 20
20 -
 21
21 -
 22
22 -
 23
23 -
 24
24 -
 25
25 -
 26
26 -
 27
27 -
 28
28 -
29
-
30
-
31
-
32
-
33
-
34
-
35
-
36
-
37
-
38
-
39
-
40
-
41
-
42
-
43
-
44
-
45
-
46
-
47
-
48
-
49
-
50
-
51
-
52
-
53
-
54
-
55
-
56
-
57
-
58
-
59
-
60
-
61
-
62
-
63
-
64
-
65
-
66
-
67
-
68
-
69
-
70
-
71
-
72
-
73
-
74
-
75
-
76
-
77
-
78
-
79
-
80
-
81
-
82
-
83
-
84
-
85
-
86
-
87
-
88
-
89
-
90
-
91
-
92
-
93
-
94
-
95
-
96
-
97
-
98
-
99
-
100
-
101
-
102
-
103
-
104
-
105
-
106
-
107
-
108
-
109
-
110
-
111
-
112
-
113
-
114
-
115
-
116
-
117
-
118
-
119
-
120
-
121
-
122
-
123
-
124
-
125
-
126
-
127
 |
 |
